
GoPro ND Filters and How to Make Them
WHY DO YOU NEED THEM?
ND filters are like sunglasses for your camera, they are super useful for any kind of video filming. Since we want to set our shutter speed to the 180deg rule(1/60 for 30FPS) double the frame rate. Our footage will most likely be overexposed and we need ND filters. There are a bunch of options like Camera Butter or the Ethix stick-on ND filters for your GoPro Hero 5 Session. PolarPro and others for the GoPro Hero 5/6/7.
Here we will show you how you can make your own for any kind of GoPro and at the fraction of the cost!
Getting motion blur is just part of getting good looking footage, check out Best GoPRO Settings for FPV to learn more about filming with FPV drones and how to color grade your footage to make it stand out.

Here is an example shot at 1/240 without an ND filter. Notice how there is no motion blur and vibrations are visible.

And this shot was filmed at 1/60 complying with the 180deg rule. Notice how there is a lot of motion blur and movement seems silky and smooth. To get 1/60 shutter speed footage not overexposed we used our DIY ND filter.
ND filters should only be used if the shot is overexposed, make sure to check your exposure by looking at the screen in the shade since the GoPro screens aren’t very bright. Use the GoPro app to check exposure on the Session. The footage should be well exposed at the lowest ISO check our guide for more information on good exposition.
ND FILTER OPTIONS
The market is full of ND Filters for the GoPro Hero 5/6/7, most hyped are PolarPro but they come at a premium price, a budget option are the Telesin ND filters but are of lower quality.
GoPro Hero 5/6/7 ND Filters
Best-selling

Most popular option
TELESIN 4 Pack ND Filter
This pack of ND filters is by far the most popular set out there, it features ND4 ND8 ND16 and CPL filters in a plastic case for easy storage. They are not durable and will break easily but for the price they are a no brainer since you will probably destroy any filter you get.
Highest quality
Best ND filter on the market
Shutter Collection – Cinema
These are the best ND filters you can get for your GoPro, they replace you lens cover and are made out of quality optical glass. They are more durable than any other option, if you have the budget, you have to go with these.
Low-profile
Stick on/off ND Filter
Camera Butter Glass ND filter
High quality, stick-on neutral density filter. If the adhesive gets dirty, you can simply wash it with water to rejuvenate it! The adhesive only covers the edges of the glass so it does not impede the crystal-clear quality.
A great alternative

Really good and cheap solution
ETHIX TEMPERED ND FILTERS
The ETHIX ND filter is made to be used with multiple lens covers, the idea is you get a couple of covers and put different ND filters on them. When you need to change ND just unscrew the cap and pop on another one. This is similar to the PolarPro approach but cheaper. Around 60$ for the whole package (3x ND + 3x Cover).
Do not buy any of the circular ND filters they are of poor quality and get destroyed in crashes.
GoPro Hero 5 Session ND Filters
The Hero 5 Session is a bit unlucky in terms of ND filters, since it is discontinued there are not many options, sure ETHIX and Camera Butter make stick-on ND filters but its kinda hard to change them. The adhesive gets unusable after 3-5 changes on the ETHIX (compromised image quality due to particles) and the Camera Butter looses its stick and is easily lost during crashes.
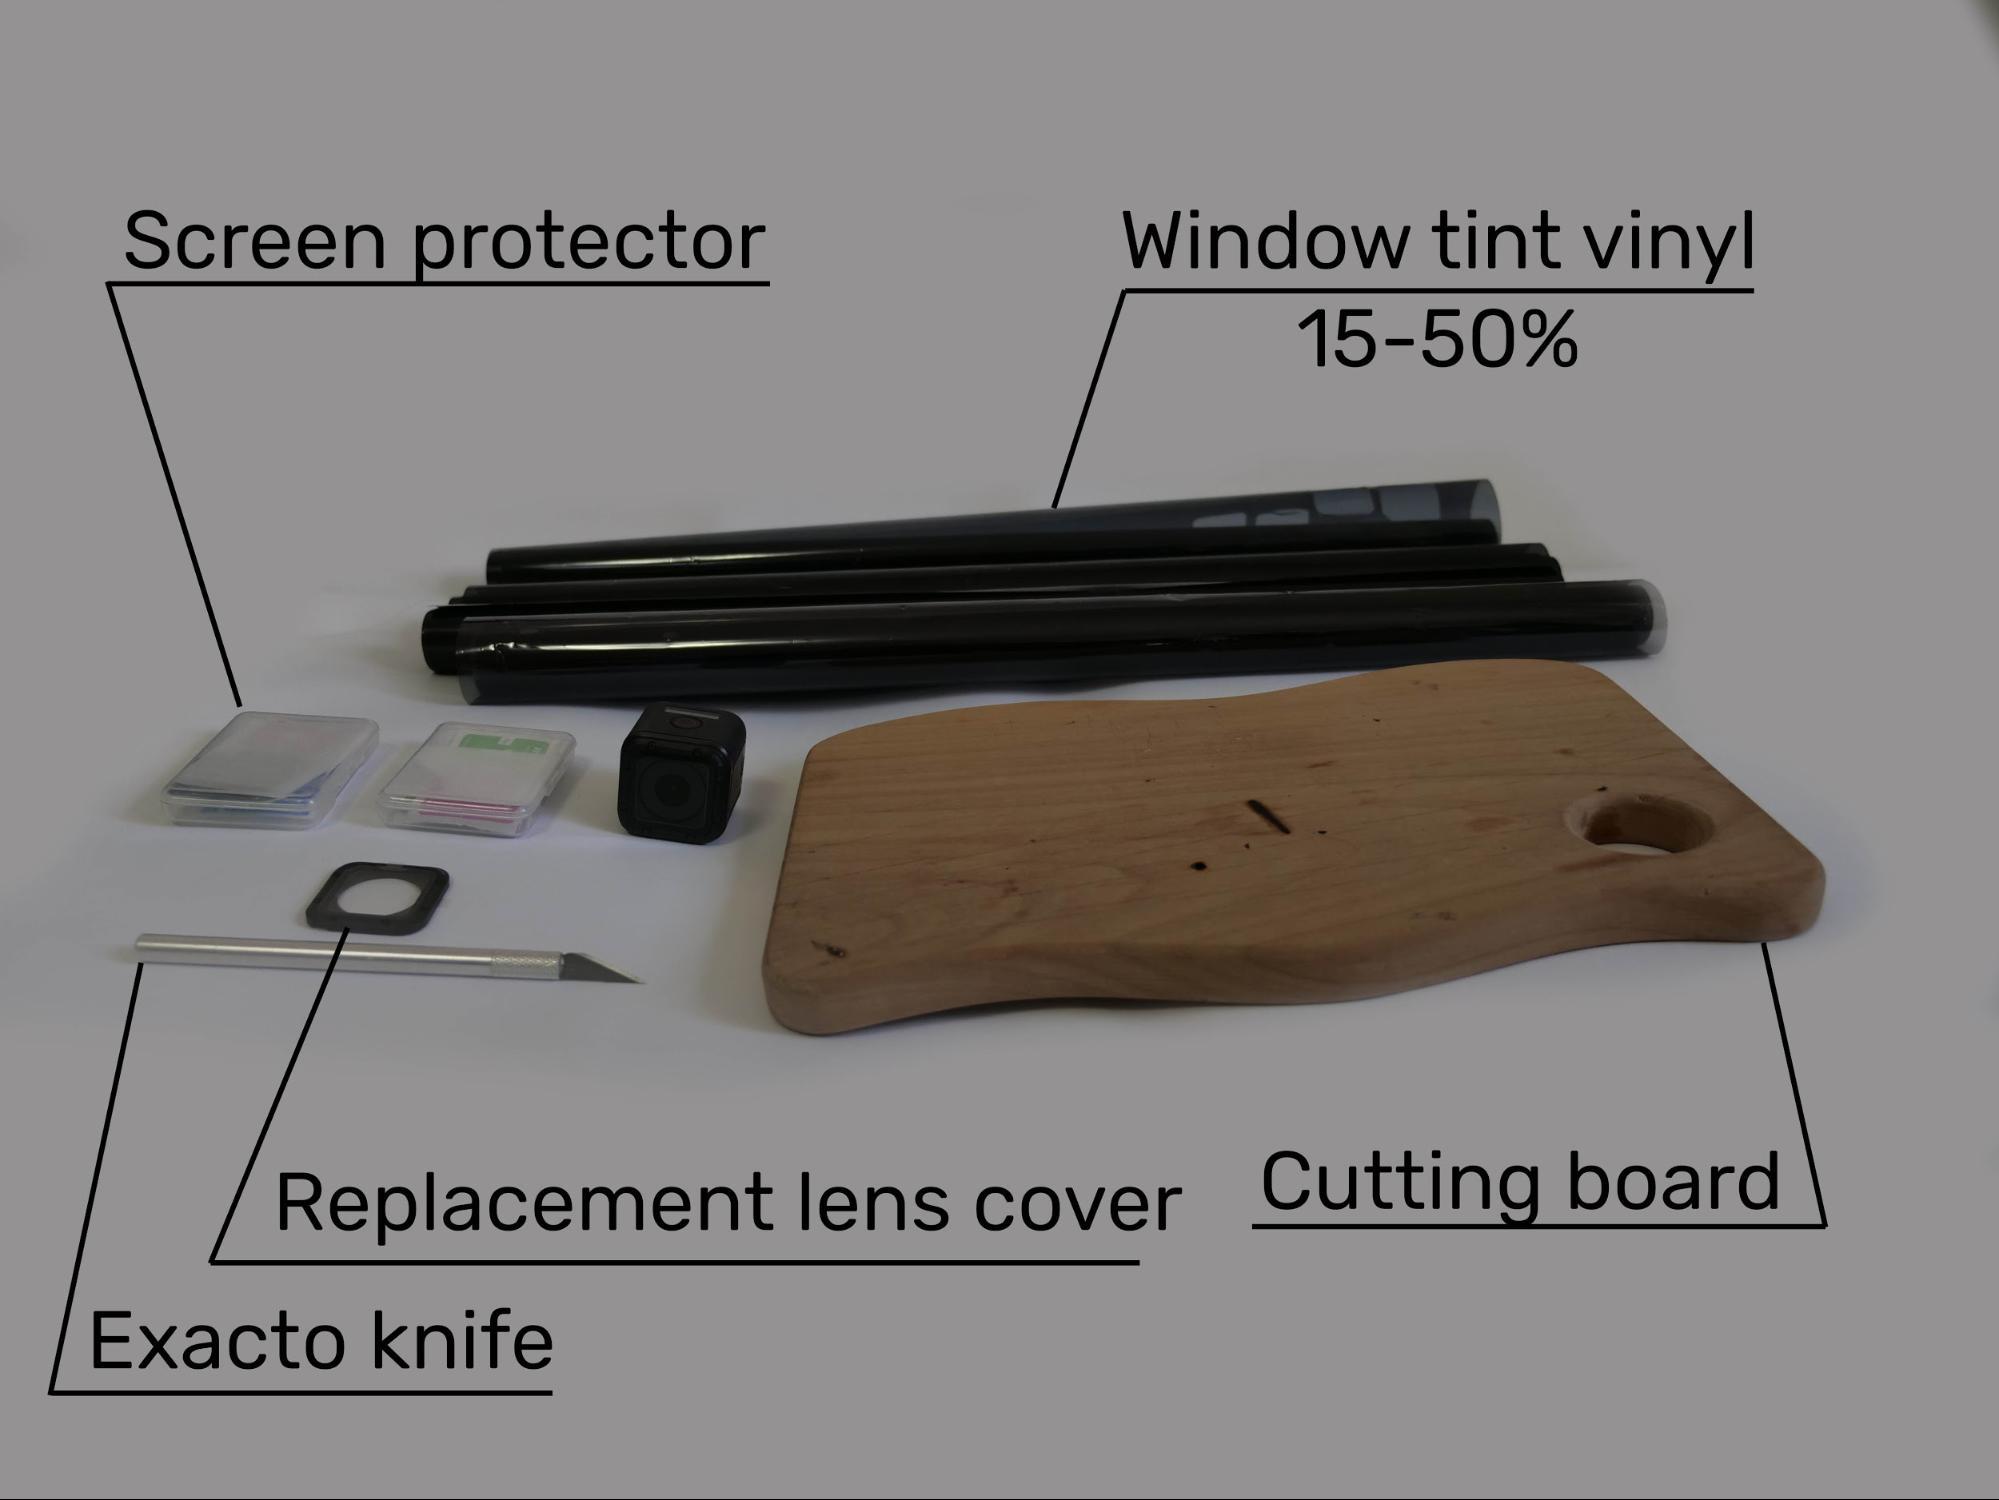
DIY ND FILTERS
The process is pretty simple, you will need screen protectors, a lot of them. Luckily they are cheap and easily available. ND filters work by blocking light, for this you can use pretty much anything, the best and cheapest option is car window tint stickers, you can find those at any car saloon or car shop, many home utility stores have them and shouldn’t cost more than 20$ for a roll that will last you a lifetime.
There are a few options regarding tint, from 20% to 90% for the most part you will use the 50% and the 30%-35%. If you need higher tint you can combine them and the ND value doubles.
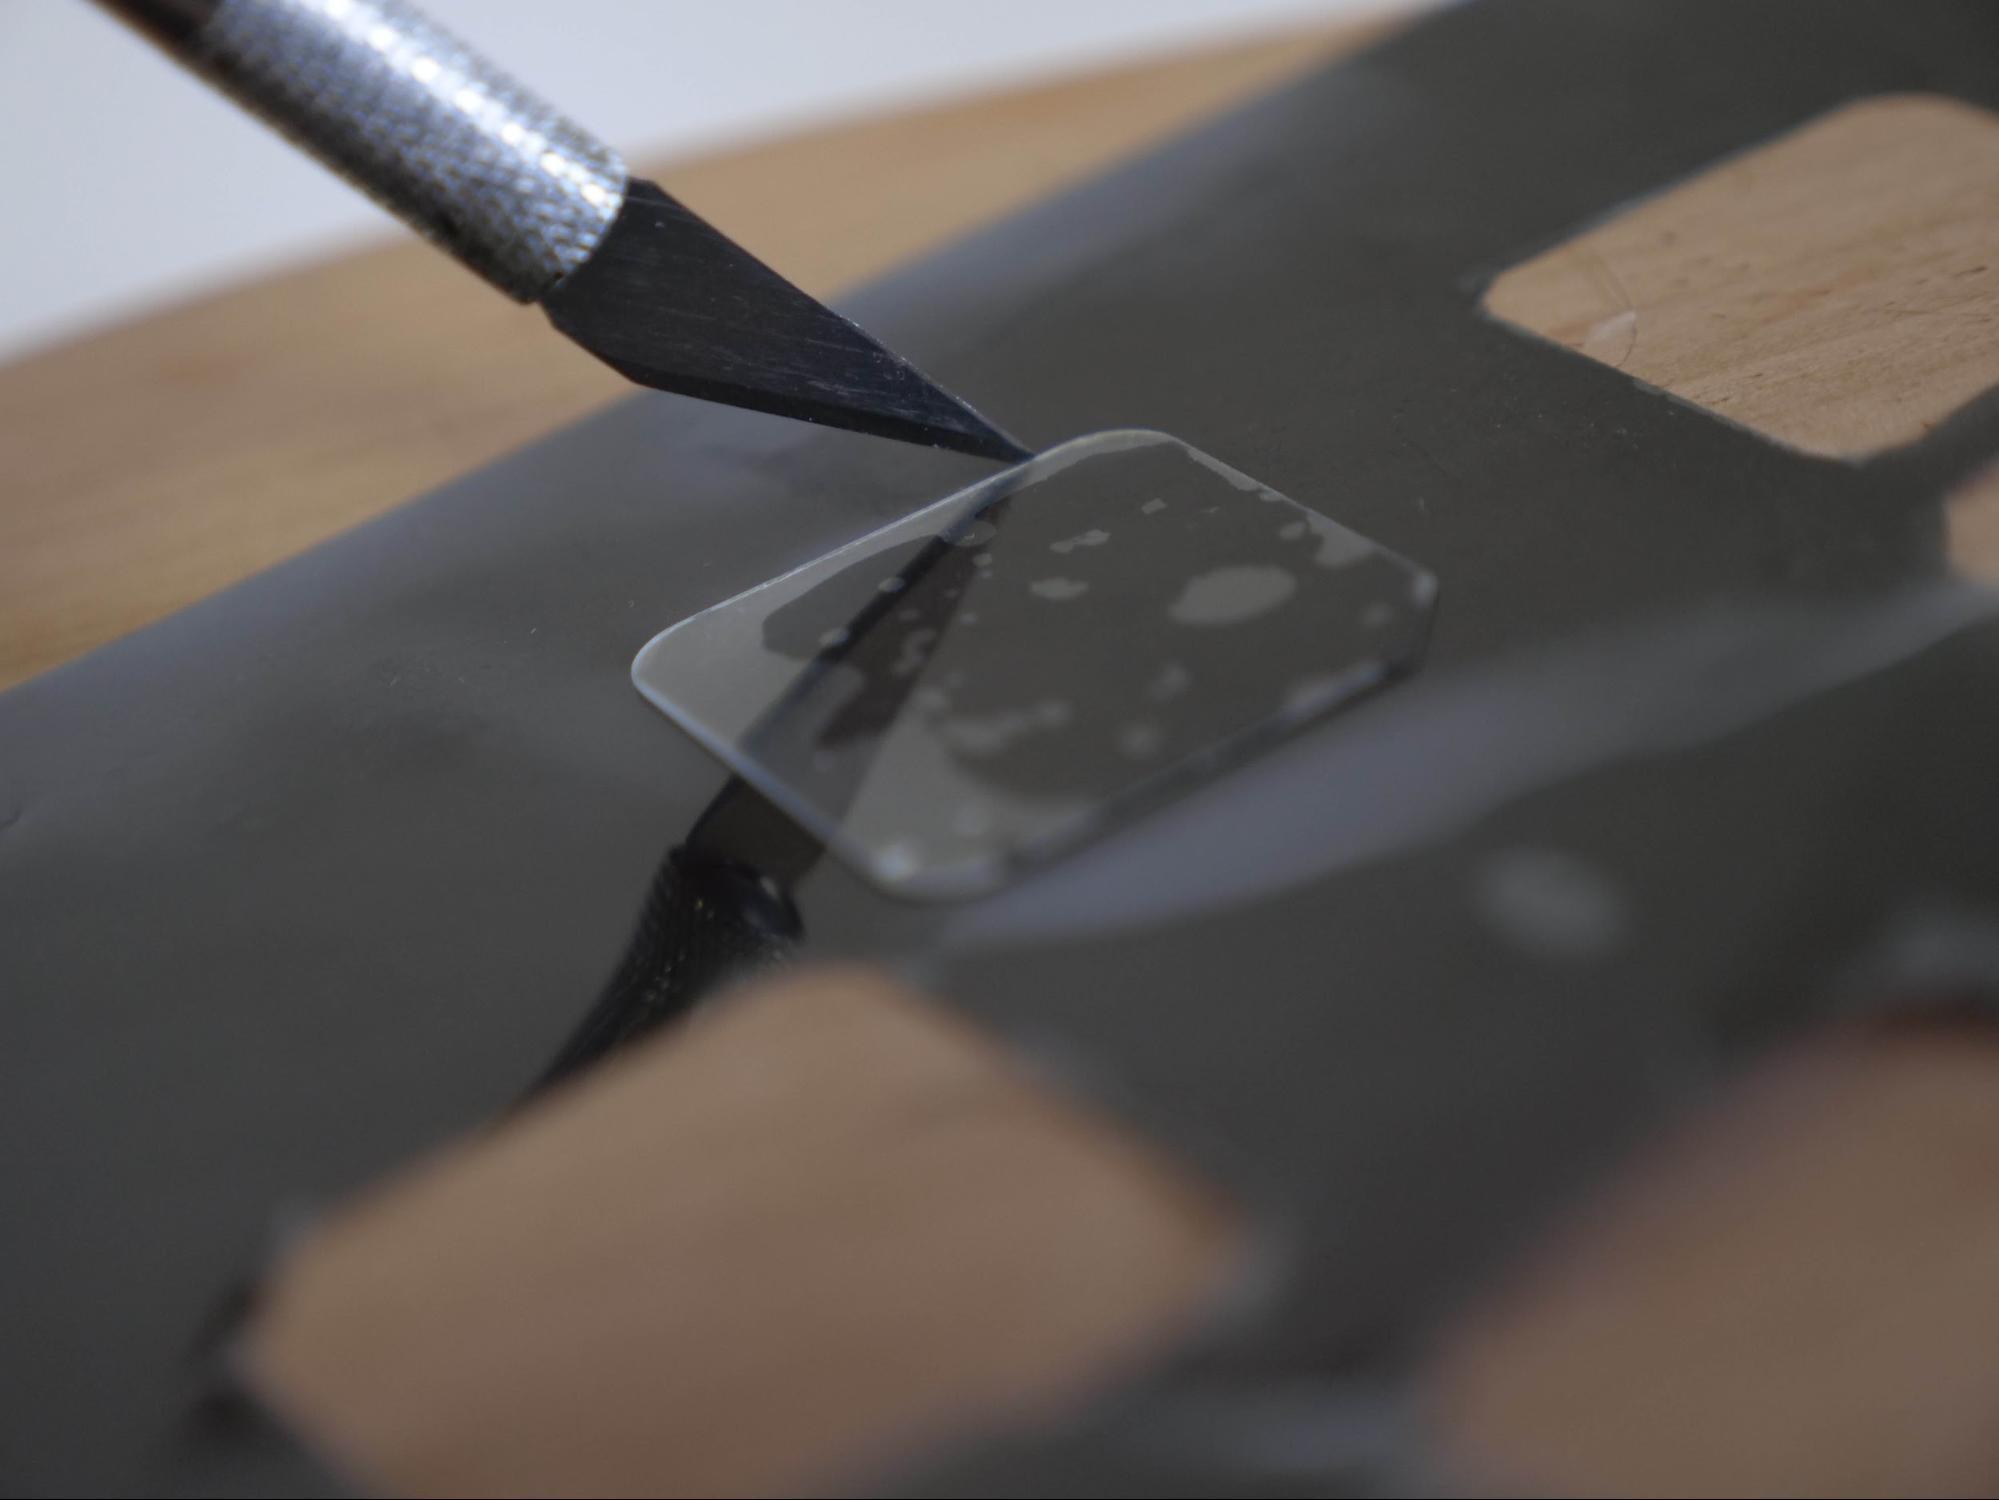
Start by unrolling the tint vinyl and stick on a screen protector on a unwrinkled area, the easiest way to cut it is to use an exacto knife. Go slow until you get the hang of it, cut out many of them since you will mess up your first few. You can use one old screen protector to use as a cutting guide. If you have the exact ND tint vinyl want to use you can stick on a new protector on an unwrinkled area and leave it there, if you do that, make sure there are no bubbles like in the photo, they will mess up you footage.
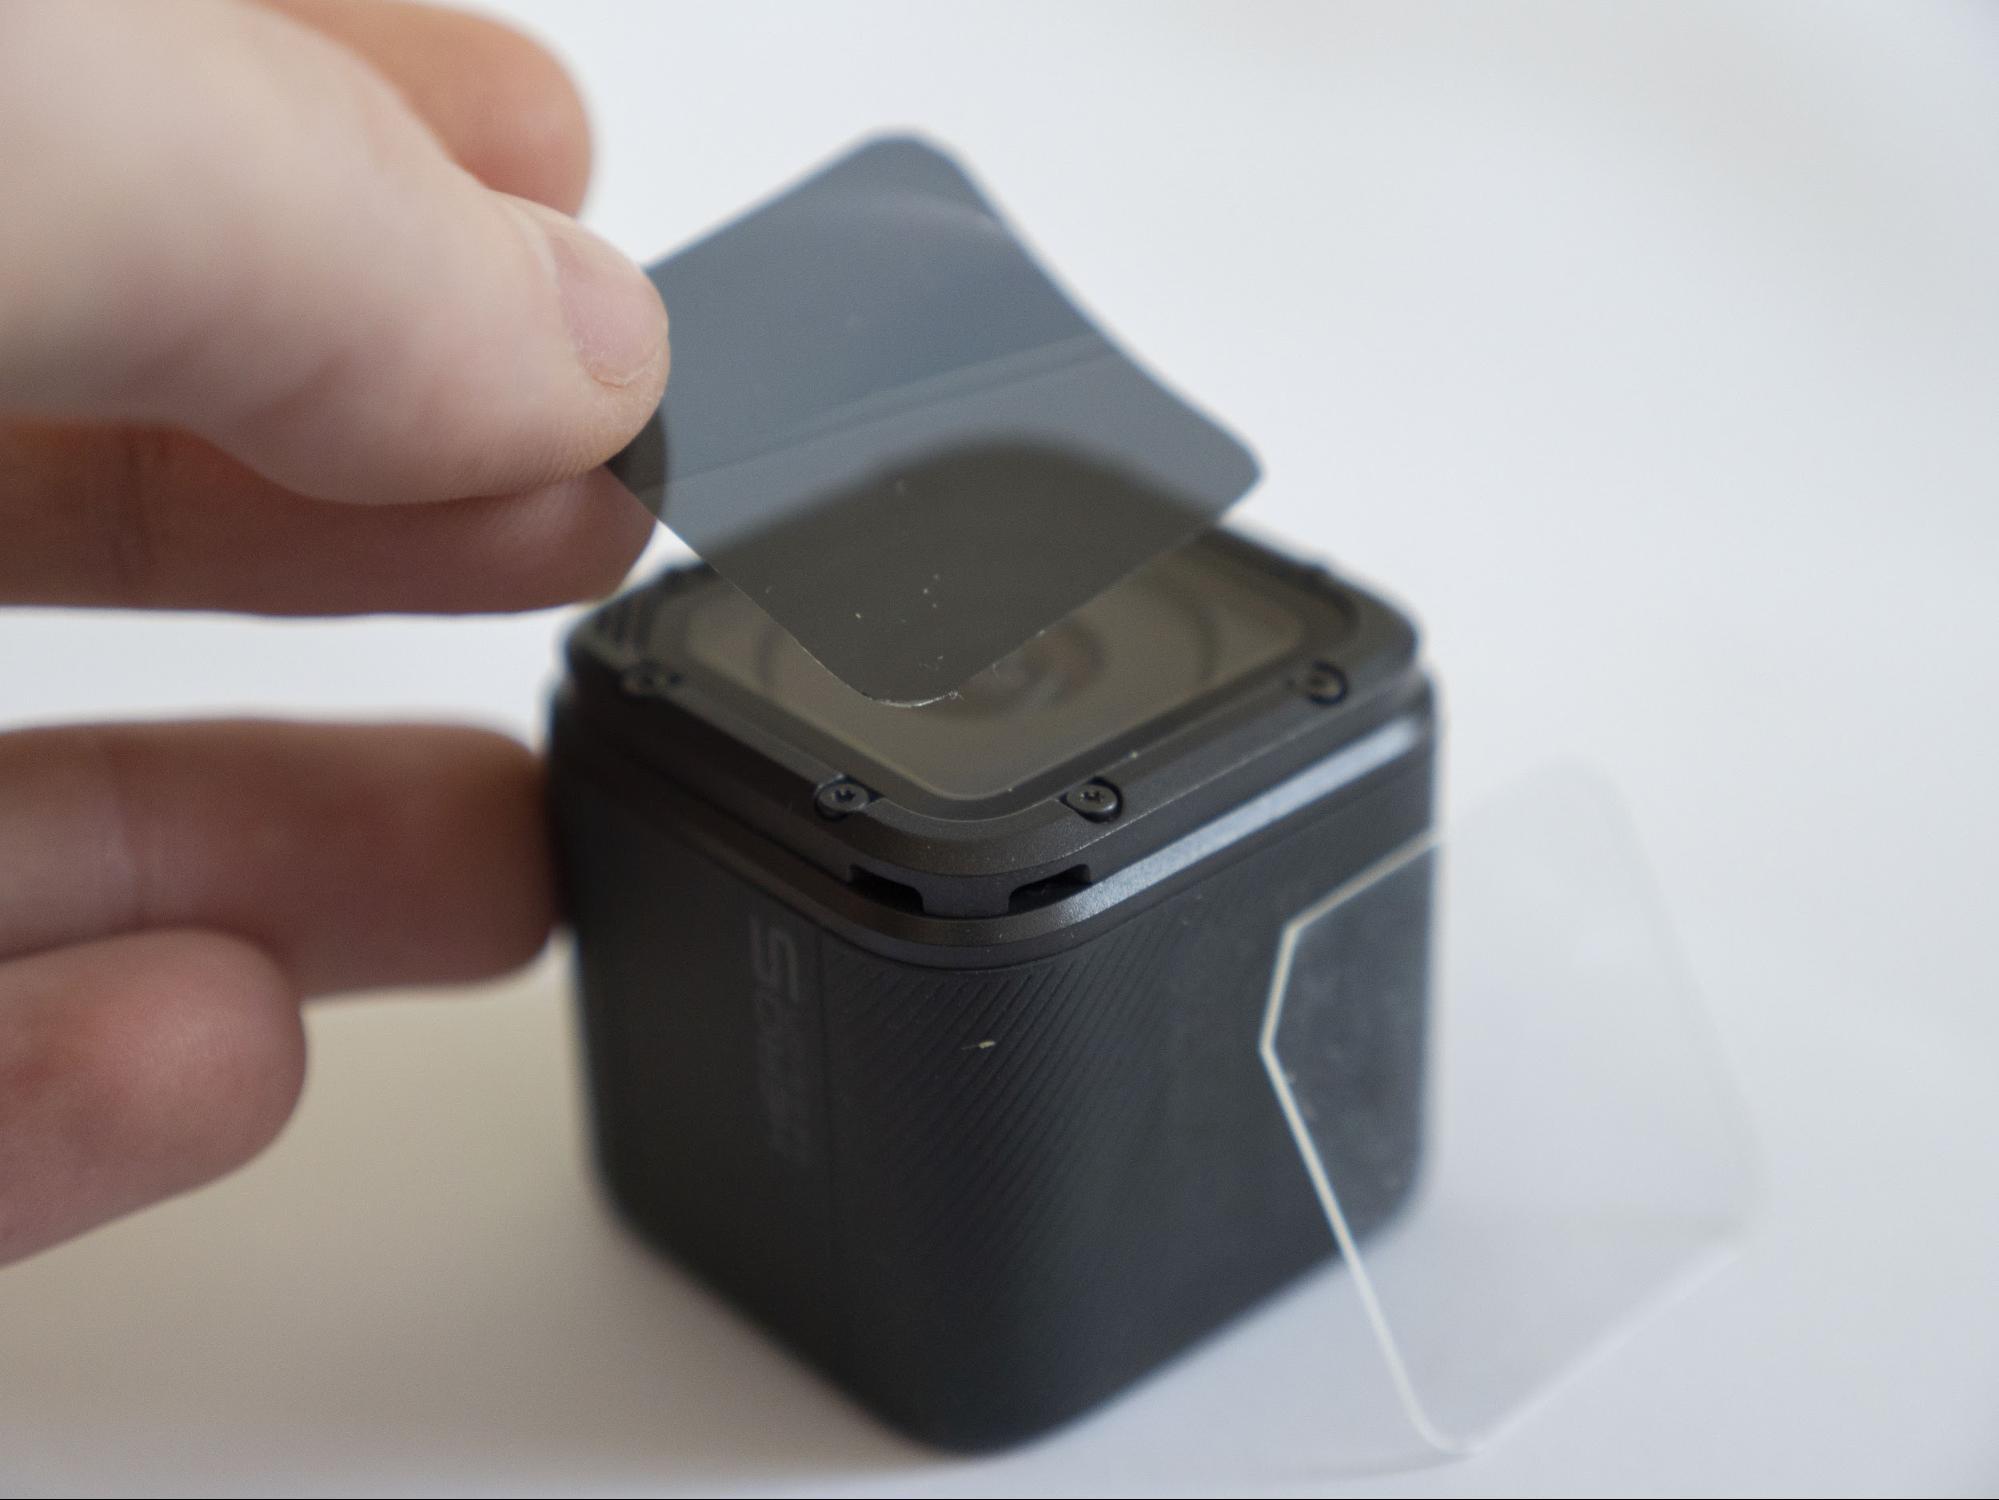
The tricky part is getting it on you camera, start by cleaning the camera glass as best as you can and work fast, dust particles in the air will settle down on your camera and create bubbles that will mess up your footage, screen protector usually come with a cleaning kit, use that to clean your camera as best as you can and quickly peel off the protecting vinyl off your tint that is attached to the screen protector. If you get large air bubbles use a drop of water to stick it on better. If you mess up your screen protector and get dust on it you can clean it by running it over water, you will not wash away the glue since it is not water-soluble.
After a few you will get the hang of it and your footage will be all buttery and nice. It is a pain in the but at first but since most regular pilots fly at the same time every session, you will not change ND filters that much.

If you want to work fast get replacement lenses for your GoPro and have a couple of them with different ND on them, it will still be cheaper than getting those PolarPro ND filters. I personally have 2 Sessions and switch them up depending on what time of day I fly. One is for hard sunlight with an ND of 30% and the other is usually without one for sundown. Clouds and weather will always be a variable so make sure you check your phone and see if the image looks well exposed.
For the Hero 5 Session and Hero 8 there aren’t that many options, most of them are going to perform better than our DIY ND filters but if price is an issue this is a good enough solution.
- iFlight BumbleBee Cinewhoop Review | Hit or Miss - August 20, 2020
- HGLRC Sector 132 Review | Unique 4K Micro Drone - April 28, 2020
- GoPro ND Filters and How to Make Them - April 1, 2020