
Understanding Quadcopter Motor and Propeller Rotation
QUADCOPTER MOTOR DIRECTION
There are 2 directions of propeller rotation: “Props-out” and “Props-in”. Both have their pros and cons. The traditional direction is “Props-in” and it’s the default for all modern firmware. It’s also a standard for all multicopters.

“Props-out” configuration with most pros for 3” quadcopters and smaller, at least when you’re focusing on notable flight characteristics. This becomes quite obvious when you’re making a sharp turn;
“Props-in” rotation configuration, sharp turn causes a sudden dip and lift just like in a dull 90° turn due to the turbulence during the yaw rotation. Some earlier whoop crafts all had this issue, until a solution was found: a reverse (“Props-out”) rotation.
Except for the aerodynamic benefits in (3“ to sub-3“) smaller crafts, it’s a good idea to set the “Props-out” direction for the FPV camera. There’s a smaller chance of damage and getting dirty during the crash. That is because the propellers rotate away from the camera so the dust, mud, grass, leaves, etc. are being discarded away from it, in the direction of a craft rim.
“Props-out” configuration is also great for indoor flying- in case you hit the wall, the craft will bounce back due to the propeller rotation direction. If you decide to fly in the woods, leaves and branches won’t be sucked in and that won’t cause you to crash.

“Props-in” would do exactly that - draw all branches and leaves in the radius of the propeller. That means it won’t be very easy to get out of the sticky situation - if even possible. While racing, catching a turn flag or a gate top bar with your drone is less likely to happen. It will just bounce off and keep flying without any trouble.
“Props-out” configuration, in theory, can be a bit more efficient when compared to traditional “Props-in” one. Propellers rotating in opposite direction change the position of thrust centre inwards (to the centre of the craft). That’s why the turbulence is not as strong on the back of the quadcopter.
Considering the quadcopter, when flying in a straight line, always has the front a bit lower when compared to the back of the craft, front propellers don’t create turbulence for the back propellers- because they’re placed lower than the back ones. When hovering, both configurations are identical and you won’t know the difference.
Cons of “Props-out” configuration are quite obvious when dealing with bigger crafts (over 4”)- high amount of dust and particles in the air will access the middle of the craft’s sides, especially if you have “true X” frame on your hands. This can damage the USB port and other connectors placed in the middle part of the frame. A good solution for this is USB (and other connectors) plugs that protect ports from the dust.

You shouldn’t forget about the Flip-over-after-crash feature. In that case -unlike the “Props-in” config, propellers will rotate in the camera’s direction (at this point the craft is upside-down). Considering the propellers are directly on the ground- dust, dirt, mud, etc will cover the camera lens which can make the flight difficult after you get back into the correct position. In “Props-in” config, that’s not the case. All the mud will be moving away from the frame centre.
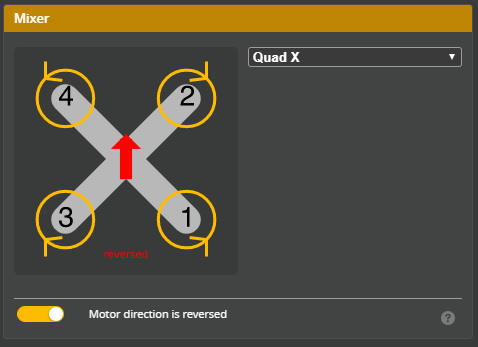
To set “Props-out” configuration, you need to reverse the direction of rotation of each motor. You can do that in BLHeli Suite program, in “Motor Direction” function. You’ll set two “reversed” motors to “normal”, and “normal” to “reversed”.

Next, you’ll set all motors to “reversed” in Betaflight Configurator. By clicking “Save and reboot”, you save the configuration and activate “Props-out” config.

The only thing what’s left to do is to switch the propellers- you set CCW propellers to CW position and CW to CCW position.
HOW TO PAIR MOTORS TO PROPS FOR SPEED OR EFFICIENCY?
In short: by the frame size.
You should always pick the propellers (their diameter) by the frame size-the biggest diameter allowed regarding the frame. The larger surface they cover (without touching the opposite motor propellers), the more efficient they are. That’s because the area not covered by propellers is smaller- efficiency refers to the propeller area (A = πr2). Even the smallest diameter increase can make a big difference and make the quad more efficient. Next step is choosing motors in regards to propellers.
Choosing the correct motor/propeller combo isn’t as easy as it seems. What makes it even harder is the fact most manufacturers don’t offer information about all propeller types you can mount totheir motor. That means even more unknown variables in this “math” of perfect motor/prop combination. What can help you here is relying on tested motor/prop combinations (identical or similar ones) or prop/thrust ratings.
PROPELLERS
Generally speaking of propellers: craft agility is conditioned by how fast it can change the thrust- how fast you can change the RPM (number of rotations) of propellers.
It’s easier to change the acceleration for smaller propellers; bigger ones need more time for that. Too much time accelerating/decelerating and you won’t be able to fly. That’s why you can see smaller propellers on hexacopters and octocopters in comparison to giant quadcopter propellers.
The propeller pitch is also important here. We measure it in inches and it represents the distance in vertical axis it takes for a propeller to make a full circle while rotating (in ideal conditions). When marking the propeller, for example, number “5145 “: 51 means 5.1” diameter and 4.5” pitch. If you want to fly faster, propeller’s pitch must be more aggressive. If you’re planning to stick to hovering speed (for filming, slow circling…) you’ll want the smallest possible pitch of the propeller.
To conclude: the speed (better say, craft’s purpose) is directly tied to the propeller’s pitch.
MOTORS
In practice, you pick the motor according to the propeller type. If you mount motor too big, it will be too heavy, and too small one won’t be efficient enough and it will most probably burn.
Smaller propellers require a higher RPM motor; they need to rotate faster to create strong enough thrust to be able to fly.
SUMMARY
All things considered, an efficient craft has optimal motor size with low RPM and large propellers. Acro quad will need smaller, more aggressive propellers, faster motors, and a bit higher voltage for a faster throttle response.
The chances of finding all torque curve combinations in RC motors are quite slim. It’s easier to find out the thrust/prop rating in combination with different prop sizes, which is very helpful when calculating how fast you’ll be able to lift the craft and how long you’ll fly it.
As a rule of thumb, the thrust/weight ratio should be 2:1 for a standard quadcopter, and 5:1 for acro/race quadcopter. Only for hovering (edge of availability) is a minimum 1.8:1.
Here’s an example: we have a craft with 1kg AUW (All Up Weight), the total thrust produced by motors at the full-throttle should be 2 kg (500g of thrust per motor minimum- If talking about a quad).
Pure racers have weight/thrust ratio over 5:1- it can even reach 8:1 (sometimes even brutal 10:1). Those ratios are useful for sharp turns, insane acceleration, and sharp cornering. We must emphasize the crafts with those rations are terribly difficult to control and you need a lot of practice to be capable of that. If you’re looking for a slow flyer and aerialrecording craft, you’ll want a thrust/weight ratioof about 3:1 or 4:1. This build allows a super-precise control and leaves enough room for payload (camera, etc) or heavier batteries if you want to extend the flight time.
CONCLUSION
In conclusion, to correctly determinate motor efficiency, the starting point is always the frame.
Frame size -> Propeller size -> Motor Size (and Kv)
Even though a lot of people will do differently, according to their needs, propeller proportion, motor, and motor’s Kv, this handy chart can be a great reference to what combo is best to have depending on the frame size.
| FRAME SIZE | PROP SIZE | MOTOR SIZE | MOTOR KV |
|---|---|---|---|
| 150mm or less | 3“ or smaller | 1306 or smaller | 3000Kv or higher |
| 180mm | 4″ | 1806 | 2600Kv |
| 210mm | 5″ | 2204-2206 | 2300Kv-2600Kv |
| 250mm | 6″ | 2204-2208 | 2000Kv-2300Kv |
| 350mm | 7″ | 2208 | 1600Kv |
| 450mm | 8″, 9″, 10″, | 2212 or bigger | 1000Kv or lower |
If you want to be fully precise when calculating efficiency, you can use old but good online eCalc calculator. Not only you’ll be very precise in your calculation, but also you’ll be able to calculate all the details tied to dynamics, flight time, motor load, etc.
You’ll have to pay the membership (only a few dollars) and it expires in a month. You get a lot for this price- you can use all parameters offered. You can even save dozens of dollars by checking if the combination you were planning to get has some shortcomings you didn’t see coming- if the flight time and motor loads are not mathematically correct.

Author: Davor Kustec
- Drone Pipeline Inspections in Oil and Gas Industry - November 23, 2023
- Wind Turbine Inspection using Drones - November 16, 2023
- Agriculture Drone Mapping: Data-Driven Decisions - October 29, 2023