
How to Fly a Drone – Beginner Guide
The guide will provide you the skill’s and mindset needed to learn how to fly a drone for the first time. Flying multirotors has become a great part-time activity for many enthusiasts in this field. However, if you’re a beginner, it may be hard to get into the whole thing from scratch. There are many aspects in play when starting out to control this kind of device, especially from beginner’s perspective.
To learn how to fly a drone properly, you’ll have to understand some flying jargon. Of course, you can go by trial and error to get to fly an rc drone but do remember, every crash is an opportunity for your quad to be damaged. Also the more you wish to advance your hobby, the more you will require some background knowledge about flight.
If you’re just starting out and want to learn the basics then BetaFPV CetusPro Kit is perfect fot a beginner. You can slowly start learning LOS flying then progress to FPV.
WHAT YOU WILL NEED TO FOLLOW THIS TUTORIAL
Although drones have been around for some years now, there is a notion that they’re reserved only for those of us with excessive budgets. Sure, professional models don’t come cheap, but there are many alternatives for beginners which can help you get into it without spending too much money.
The commercialization of multirotors made them accessible for a wide variety of users. So, if you’re a beginner, we would advise you to practice first with fpv drone simulator, where you can practice both FPV and LOS mode. The alternative is to learn how to fly a toy-grade drone first before buying more expensive configuration.
Furthermore, if you know someone who already owns a quadcopter, you could spend some time watching him or her and see how the whole thing functions. They might even let you try it for yourself. This is an excellent way to see if you’re really interested in this kind of activity.
After you sharp your skills flying one of the toy drones, you can progress to fpv systems – and that’s where the fun really starts. Check out our guides on racing drones and micro fpv quads to learn more if you want to get in FPV.
If you haven’t flown a quad before, best advice is to start with affordable drone models, a cheap quad to practice on, and brush your skills without headless mode. There will be lots of people that crash into trees and houses with the mavic because they didn’t yet develop muscle memory for the controls.
For this tutorial, however, we would suggest having your own quadcopter model so you can take some time getting to know all the different things that are in play here.
In order to follow this tutorial, you’ll need:
- A quadcopter model
- An open area to practice on
- Enough time to practice
- Patience
I assume you already made a plan as to when and where you’re going to have your first drone lesson. Make sure that the space you’ll use is safe for you to fly the quadcopter. Places with high traffic or other people around may not be the best option, especially for beginners who want to get into the basic maneuvering.
Another thing you should consider is checking if space is permitted to be used for flying drones. There are many new laws already in place to make sure that nobody is endangered by this activity, so make sure to check carefully out what is and what isn’t possible in your surroundings.
Free time is essential to hone any skill. Flying drones are no exception. You have to have a lot of free time to make sure that your handling of the quadcopter becomes fluid. Small steps are the key here. If for example, you want to get better at landing, you’d be advised to spend a few sessions only on that.
This leads us to the last thing on our list: patience. If you get frustrated in the beginning because the quadcopter doesn’t behave the way you want it to, patience is the key to your success. Don’t let it get the better of you. Over time, you will see how professional looking your maneuvers become, and, just like me, feel silly about ever doubting that you could learn to fly it with such ease.
BASIC TRANSMITTER ANATOMY
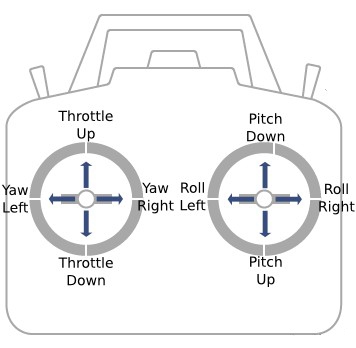
One of the first things you will encounter with multirotors is the transmitter. Knowing what the different buttons and sticks represent is the key to knowing how to fly a drone. We will concentrate in this section on the functions of the left and right stick. Depending on the model you’re using, quadcopter transmitters can have many buttons for various functions.
More professional models can be rather overwhelming at first, but in time, you will get a feeling on how to embrace all of the options you’ve been given with your particular model. The common thing for every drone model we’re going to talk about here is the left and right sticks. These sticks control almost 90% of the basic maneuvers you can do with your quadcopter, so it would be wise to read carefully what their functions are and how to get the most out of these basic functions.
LEFT STICK (yaw/throttle)
The left stick controls two aspects of flying a quadcopter: the yaw and the throttle. Getting familiar with the terminology used here is imperative.
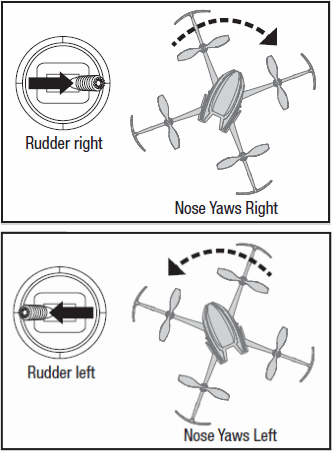
YAW
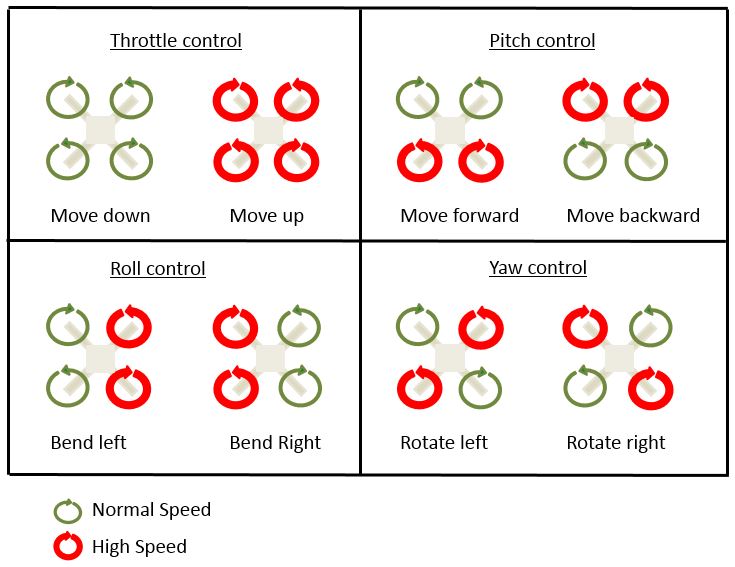
The Yaw is the rotating of the multirotor left and right. So, if you push the left stick on the x-axis (left or right), it will make the quadcopter rotate in that specific direction.
Rotating helps you position the quadcopter without moving it from the current spot in midair.
It is very important not to confuse this with rolling (which we’ll get to later)
Although it’s very straight forward when using yaw control – you’re rotating your drone clockwise or counterclockwise – it takes time and practice to learn and get familiar with the confusing orientation changes created during a yaw.
THROTTLE
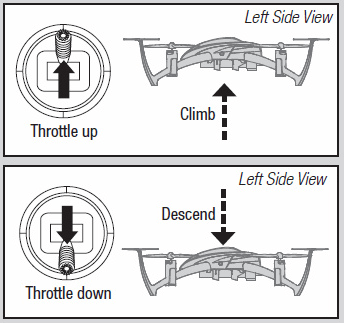
The throttle is the moving of the multirotor up and down. This control is on the y-axis of the left stick. If you move the left stick up and down, the quadcopter will change its altitude.
When flying you’re gonna need to control the throttle all the time, and for someone just beginning and starting to play with a new toy – controlling the throttle and hovering your quadcopter would be some of the first steps you want to get yourself comfortable with.
RIGHT STICK (roll/pitch)
The right stick controls the movement of the quadcopter on the x-axis, that is to say, it controls the roll and the pitch.
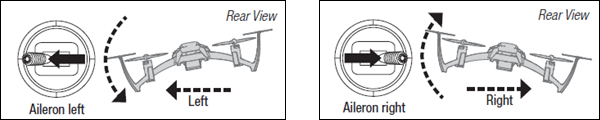
ROLL
The Roll is the moving of the quadcopter to the sides. If you move the right stick to the left or to the right, the drone will respectively “roll” in that particular direction. This movement doesn’t change the quadcopters altitude (the position on the y-axis) but only the position on the x-axis.
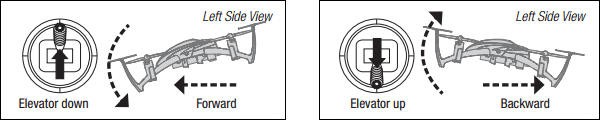
PITCH
The Pitch is the moving of the quadcopter forward and back. If you push the right stick up or down, the quadcopter will respond by moving forward and back. To make sense of the right sticks movements, you have to know the orientation of the drone, that is to say, knowing what the front and back of the model is.
HOW TO FLY A DRONE FOR BEGINNERS – STEP BY STEP INSTRUCTIONS
Now that we’ve seen what the basic commands for flying a drone, let’s take a look at how to actually use this knowledge in order to fly it. In this step-by-step guide I will assume that you’ve made yourself familiar with the particular model you have at your disposal. Furthermore, I will not get into the location you picked for your first flying test, as I think we’ve made it clear what to consider when choosing that.
1. Read the instructions first
The first thing you should do is carefully read the instructions provided with your drone. The manufacturer is responsible for providing you with all the aspects you need to know regarding the features. Don’t take this part too lightly, as it may come in handy if any problems occur.
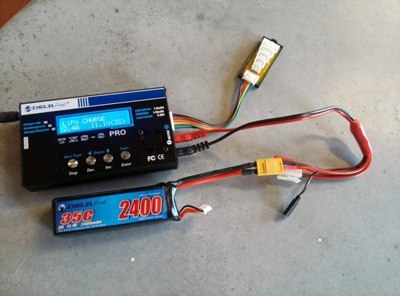
2. Charge your quadcopter battery
Before you can take off with your quadcopter, you’ll have to charge the battery first. It is highly recommended to use ONLY the charger and the battery that comes with the device. If you have problems charging the battery, you should consider contacting the manufacturer as it is not advised to use other parts for your drone than the ones provided.
3. Quadcopter Positioning
You have to ensure that the space you’re using is clear from any danger, as we have stated before. Furthermore, be sure that the quadcopter is positioned according to the manual. You have to know where the front and the back of the model are. Position yourself behind the drone before taking off.
4. Push the quadcopter throttle down
Remember the throttle command on the left stick? Yeah, that one. Before you switch on your transmitter, push the throttle way down. Only then turn the transmitter on. After that, connect the quadcopters battery. This sequence is very important. When you are finished with your flying session, first, disconnect your drone battery, and then turn off the transmitter. Basically, the same thing in reverse order. Remember it.
5. Take off and land
The first flight maneuvering you’re going to do is taking off and landing. When you did all the previous steps, you may slowly push the throttle (left stick) upwards. The quadcopter will start to take off of the ground. If the quadcopter starts leaning forward or backward, compensate this by using the pitch command (right stick up and down). The same goes for the roll control (right stick left and right). If you see that the drone is leaning to either side, compensate and hold it in balance for now.
After taking off, keep the drone in balance and try to land it as smooth as possible. This is done by pushing the throttle command (left stick) down. Attempt to land it on the same spot from where you’ve taken off.
6. Take off and hold quadcopter position
The next thing you’re going to do is taking off with your quadcopter and holding it in position a few feet above the landing spot. It is imperative to remember that this step requires concentration in holding the position.
Keep the drone steady and hold it as still as possible over the spot you took off of. This may seem tedious at first, but learning this technique will get you a long way in getting a hang on how to start and finish your flying session. Furthermore, it will make you a safe “pilot” and will ensure a long lifespan for your device.
Without learning how to execute these basic maneuvers of taking off, landing and balancing, you’ll have a hard time later when we get to the more complicated stuff. So practice this for a while first.
7. Rotate the quadcopter
One of the most important things with quadcopters is learning how to execute the rotating commands adequately. Remember, the yaw control (left and right stick) controls the rotating of your multirotor drone. If you followed all the instructions above, you would be standing behind the quadcopter for the most of the time you learned how to take off.
Now, we’re going a bit more complex with our lessons. You have to take off and rotate your drone in regards to where you’re standing.
Now, this might sound easy enough, but as soon as you try it you will see the problem here. You see, the quadcopter, when rotating it, will change the position in the frame of reference towards where you’re standing. If you’re just rotating it, the drone will not amend its position, but it will leave you wondering where its back and front are if you don’t pay attention.
8. Create a mental image
Even professionals don’t always have it easy in determining how the quadcopter is oriented in reference to them. But, they still have a slight advantage over the rest of us who might just begin to learn how to fly a drone. They have experience.
But, how do they do that? Simple, they create a mental image of themselves being in the drone. This way, they stay on course, regardless of how many times the quadcopter may turn and spin.
Of course, you won’t be able to do this instantaneously on your first try. Maybe not even on your tenth one either. But, the more comfortable you get with the controls, the more you will get a feeling on how the drone behaves. This brings us to…
9. Getting to know quadcopter controls
But wait! Didn’t we talk about the controls in the beginning? Yes, and no. At the beginning of this article, we discussed the concept of flying a drone using the controls for the yaw, throttle, pitch and roll. But now that we’ve got an actual transmitter in our hands, we must think about it for at least a second. Actually, it would be rather important to reflect on the transmitter ONLY for a second, because we need to forget it as soon as possible.
What do I mean by that? If you’ve ever played a video game in the past 25 years, you might be familiar with the concepts of gamepads. When we’re playing an action game, we often forget that we’re holding a gaming pad in our hands, but we still manage to control the character on our screen without the need for looking down on it every two seconds.
The same thing has to happen here as well. You have to get used to the transmitter as soon as possible, and then totally forget about it. If we do that, we’ll have more time to concentrate on the mental image we talked earlier.
You’ll have a clearer understanding of how the drone behaves, once the controls on the transmitter become as plausible to you as controlling the movement of your limbs.
10. Combine quadcopter controls
Now that I’ve pushed you in the right direction regarding the things you have to learn in order to become a competent pilot, it is time to combine these lessons into one coherent session. After taking off, try moving the quadcopter forward and backward (until now, we’ve only used these commands to stay in balance). Don’t use the yaw control for now, just fly forward and backward a few times, to get a feeling of how fast your drone is.
Now, do the same thing with the roll control. Fly your drone to the sides left and right while keeping the same altitude and orientation. Good! Now, these are the first two commands we want to combine. Try moving your drone forward and to the left to see if you’re going to get a parallel flying path. Repeat this for all the directions and combination on your right stick.
OK. It’s time for the tricky part. You have to rotate your drone a tiny bit with the left stick and leave it like that. Now, by only using the right stick, try to control the drone forward and backwards, while you remain in the same position. In the beginning it will feel a bit weird, but eventually, you’ll get used to it. Repeat this a few times, and then rotate the drone a tiny bit more.
Do the same until you arrive at 180 degrees. The drone is now turned in the opposite direction than in the beginning. Practice this and get a feeling on how to position the drone to your liking.
11. Keep the drone close
One of the biggest mistakes that happen, not only to beginners but professionals too, is not keeping the drone close enough to yourself. Of course, we all want to fly our drones through the air and not be bound by borders. That’s why we bought the thing in the first place. However, we need to know what our drone limits are.
The first thing we have to know before flying off into the sky is the range of our transmitter. Here comes the manufacturer’s manual into play. We have to look up the recommended range and the maximum limits for the specific model we’re flying.
Yes, newer models have an integrated landing mechanism that lands the drone safely as soon as it gets out of range. However, the machine cannot control the drone from being damaged due to landing on an inappropriate landing site.
The other important aspect regarding range is our capability of having an overview of our flying. The drone can stay in the range of our transmitter, but this means nothing if we can’t make out the drone’s orientation in reference to ourselves.
My first encounter with this problem happened as I first tried flying my new drone in the woods. The weather was perfect, the range of the transmitter was OK, but after only a few minutes, I couldn’t make out how the drone was positioned above me. My view was blocked and I just couldn’t position myself. Needless to say, I had to do a couple more practice rounds in an open field, before I was ready to go to the more difficult terrains.
12. Take care of your quadcopter
A thing many of us forget, so remember to take good care of your drone! We often forget how sensitive this technology still is, so be sure to clean it after every use and take good care of your device as well as the transmitter.
CONCLUSION
Quadcopters or drones have become accessible devices that can be used in a wide variety of ways. Professional photographers and filmmakers utilized quadcopters in their craft and made them almost a part of the standard equipment used today.
However, a significant portion of the people currently owning drones are into them simply for recreational purposes. Flying quadcopters is fun, as simple as that.
Still, no matter what you may want to use quadcopters for, you still need to invest some time into learning all the different aspects of flying a specific drone. Yes, it may be tedious in the beginning, limiting yourself to a smaller area and doing only basic maneuvers, but I hope I shed some light on what the payoff of will be if you show a little patience while learning how to fly a drone.
Once you learn the basics you’ll want more, and to fully understand all the dynamics of quadcopter flight – best way is to dive in your own drone build, check our diy drone guide if you want to learn more. If you liked this article and if it was helpful, then please feel free to share it. For any questions, please leave a comment bellow.
- Drone Pipeline Inspections in Oil and Gas Industry - November 23, 2023
- Wind Turbine Inspection using Drones - November 16, 2023
- Agriculture Drone Mapping: Data-Driven Decisions - October 29, 2023
A very informative insight on how to fly a drone. It would be helpful for first-time flyers. Keep up the great work.
Great tips! I would add that every new user should be familiar with the strict rules imposed by the FAA. There are specific landmarks where you aren’t allowed to fly a drone e.g – The White House (yes, there have been incidents). Also, I’m very happy to see that you’ve included the “creating a mental picture” technique. Thanks for sharing.
Tnx Len, you can check our piece on Drone Regulations here: https://dronenodes.com/drone-law/
I like The carefull info.Thanks a lote. Very helpful thumbs upé.
Thank’s Luis!
hi!