
FPV Racing Drones
We made a guide with the intention to be a resource for anyone who wants to start with FPV and drone racing. To be honest, it’s not easy and it takes some time. There’s a steep learning curve and it can feel a bit overwhelming at first, but once you dive in, prepare for an addiction because, there is no turning back.
WHAT IS DRONE RACING?
FPV Drone Racing is a sport in which pilots race RC drone’s / quadcopters (quads) through a series of obstacles, gaps and gates (standard gate size for quads using 5” propellers is 5’x5’). Video is live streamed from a camera on-board the craft to a video receiver on the ground.

This is connected to a display, most commonly fpv goggles, which are worn over the eyes to immerse the pilot fully into the on-board experience. This type of flying is called FPV – First Person View.
Racing quads are really fast, the fastest are capable of speeds of over 150MPH, however it is the acceleration and maneuverability that is truly phenomenal. A racing quad can accelerate from standstill to its maximum speed in under 2 seconds, and your rates in BetaFlight can be tuned to rotate a full 360 degrees on any axis, 3 or even 4 times per second! If a pilot were to actually be on board for this level of acceleration the ‘G’ forces would likely prove fatal to the human body!
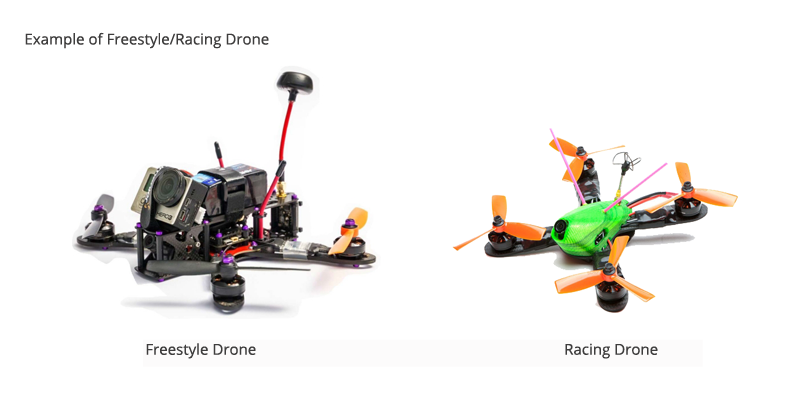
FPV Freestyle
FPV freestyle involves navigating the drone around obstacles, small openings, or tight corners. It’s not about lap race but to show the art and beauty of controlling the drone in different environments and executing precise maneuvers. In freestyle competition, you can combine both LOS and FPV flying. You’re expressing your technical and artistic proficiency while adding unique flare to your flying.
These days FPV freestyle competition often takes the actual FPV view into account, so even if your quad is doing the most amazing aerial acrobatics, if all your FPV camera sees is the sky, you will likely not be given great scores by the judges.
Again pilots who flip and roll at extreme speeds may be marked down because the FPV view is just a constant blur of movement. Freestyle has been called “The Aerial Ballet”, however some pilots, like Skitzo, are more like “Break Dancers”! I think a combination of smooth flying with confident, direct changes of direction, good use of altitude and points of explosive and well executed maneuverability are likely to get the best scores.
DRONE RACING KITS AND COMPONENTS
If you have some background in soldering, DIYing and engineering you will have no problem putting a quad together. There are tons of videos that help you to put together a quad. Even though if you have no experience in soldering and such, learning those skills to put together a quad will definitely help you in the long run.
Buying parts for a quad is a very laborious process and selecting compatible components for a quad can take several hours. This selection process can be confusing and a noob can have a hard time looking at the fine details and to pay attention to and buy. Hence manufacturers decided to give the consumers KITS as part of their strategy to help beginner’s get into the hobby relatively easily.
KITS are components picked by manufacturers that are compatible with each other. Kits may consist of frames, flight controllers, ESC’s, motors and receivers. Some kits may or may not include receivers and the kits which do not include receivers, will have a receiver compatibility list. Most Flight controllers support major protocols like PPM, IBUS, SBUS, DSM and Crossfire.
Considering this, the following is our recommendation for various configurations. Models we listed may require additionl equipment, you may have to purchase a transmitter, receiver and goggles separately.
| Model | Frame Size | Prop Size | Version | Details | Rate |
|---|---|---|---|---|---|
| Eachine US65 | 65mm | 31mm | BNF | Review | 4.5/5 |
| Emax Tinyhawk | 75mm | 40mm | BNF/RTF | Review | 4/5 |
| Eachine Trashcan | 75mm | 40mm | BNF | Review | 4.5/5 |
| Happymodel Mobula 7 | 75mm | 40mm | BNF | Review | 4.5/5 |
| Diatone GT R249+ | 115mm | 2.5 inch | PNP | Review | 4/5 |
| Emax Babyhawk R | 136mm | 3″ | BNF | Review | 3.5/5 |
| Diatone GT R349 | 135mm | 3″ | PNP | Review | 4.5/5 |
| Emax Hawk 5 | 210mm | 5″ | BNF | Review | 5/5 |
| Eachine Tyro 99 | 210mm | 5″ | DIY | Review | 4/5 |
| Armattan CF-258 | 258mm | 6″ | DIY | Review | 4.5/5 |
What is the difference between RTF, BNF, PNP and DIY Kits?
RTF stands for ‘Ready to fly’, it means you can fly your drone out of the box. Charge the batteries, bind the transmitter and you’re ready to go.
BNF stands for ‘Bind-N-Fly’. You need to have your own transmitter or purchase the one going with BNF model receiver. You need to check the details on each model.
PNP stands for ‘Plug and Fly’. Model requires that you solder your own receiver to assemble functional drone. Remember to select the correct RX option for your TX.
DIY Do It Yourself – is the inevitable end point when you’re seriously into FPV. There’s no way around it. Eventually you’ll crash your drone where you will need to repair it yourself.
BNF

Top Performance
Emax Hawk 5
The Emax Hawk 5 might be the best BNF racing drone available. Emax did a superb job with this one. It’s durable. Fast and nimble. It’s even got a custom PID tune configured by pro racers just for it.
Cheap FPV Racing Drone Kit
BNF

Cheap Racing Drone Kit
EACHINE TYRO99
The “99” in the Tyro99 indicates the cost of the quad itself. The Tyro99 comes as a kit version with all the parts minus the receiver and you have to put it together and a quad that is insanely an under priced 5” quad at $99
From a beginner’s point of view, this quad is really easy to put together and sharp your soldering skills. If you have the right tools, which I’m not sure, you have check out tools required for building a quad.
| Property | Specifications |
|---|---|
| Flight Controller | F4 flight controller with STM32F405 ICM 20602 Gyro |
| Frame | 3K carbon fiber Wheelbase- 210mm 5mm thick arms with 2mm bottom and side plates |
| ESC | 30A continuous, 40A peak 2-5S Input voltage Dshot600 |
| Motors | 2206 2150KV Max thrust- 1050g (4S/5” prop) |
| Camera | 700TVL CMOS , PAL/NTSC switchable |
| vTX | 0mW/25mW/200mW/600mW 40CH switchable output power |
| Propeller | 5038 2 blade |
| Recommended Battery | 1300-1500mah 4S(not included) |
Eachine included a lot of spares, 10 pairs of propellers to be exact. Yes can you believe it 10 pairs for a quad that costs $99. You also get a couple battery straps, few zip ties and a couple sticky pads for batteries.
The frame feels stiff and rigid which should take a lot of abuse before breaking, but unfortunately you don’t get replacement arms. The motors perform really well and pack quite a punch.
The camera lens is exposed and is bound to get damaged during a crash. The vTX is placed such that if the quad falls upside down, the vTX might get damaged. The motors are of avarage quality, but hey you can’t complain.
I can blow a $100 on a set of motors alone but a whole quad minus a receiver for $99, I’m sold. I’d say get this drone and you will be amazed at how well this performs. Overall this is one of the best beginner kits money can buy.
The Tyro99 also comes as BnF version where you just need to add your receiver, with receiver support for PPM, SBUS, XBUS, DSMX and DSM2 covering all major protocols.
BEST FPV RACING DRONES ARE BUILT FROM GROUND UP
There are so many different models and components for First Person View Racing, that it’s really hard to separate them. We have split our recommendation into 4 categories (Beginner or First build, Micro build, Advanced and Expert)
Be patient, try to practice as much as you can, go over our preflight check-list and get a simulator as soon as you have a TX to practice with. Maximize the crashes in the simulator to minimize crashes in the field. In the end you want to have more flying time / less repairing time.
We always suggest to anyone who is interested in quadcopter racing, to buy the components, and assemble it yourself. This way, you’ll be familiar with the electronics, be more prepared diagnose problems and fix something when it breaks. Damage to your quad is an inevitability, we fly fast and crash hard.

Most repairs are minor, such as a disconnected wires, broken antennas, cracked FPV camera lens, etc. Remember the mantra “Build, Fly, Crash, Repeat” The more you “repeat” you will recognize and diagnose failures more quickly, and repairing them will soon become second nature.
DRONE RACING PARTS AND COMPONENTS

FRAME
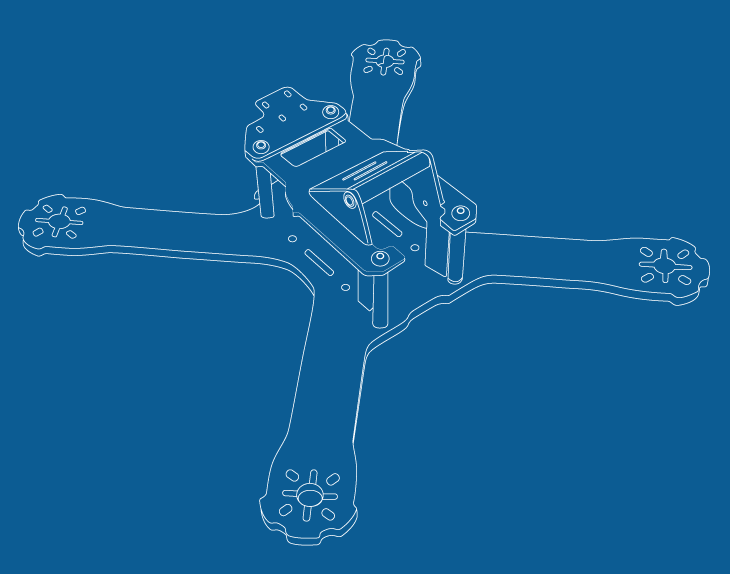
As you may already know, to build a drone from scratch you’ll need a dozen different parts. Aside from the size of propeller the quad frame is usually one of the 1st components you will choose and it will determine some of your choices for other components too.
So the things that you want to look at and what makes a frame stand out from others; is the shape of the material that it’s made out of; the thickness of the base plate and then also how easy it is to build onto it.
Now there’s a whole bunch of frames on the market and I can’t actually believe how many new ones are popping up all over the world. It can be very overwhelming, you don’t even know where to start looking for a frame.
It all just depends on what you want to use it for:
| Name | Size | Prop | Motor | Weight | Rate |
|---|---|---|---|---|---|
| TBS Source One | 220mm | 5″ | 22xx > | 140g | 5/5 |
| Armattan Chameleon Ti | 220mm | 5″ | 22xx > | 123g | 4.5/5 |
| ImpulseRC Reverb | 225mm | 5″ | 22xx > | 122g | 4.5/5 |
| Martian II | 220mm | 5″ | 22xx > | 145g | 3.5/5 |
| iFlight Vector | 225mm | 5″ | 22xx > | 120g | 4/5 |
MOTORS

When building quads there’s two types of motors, the first one is brushed.
A brushed motor is great for a quad that’s really tiny in flat weight motors. it works by having a brush in the bottom half of the motor which is the polarity and because of this it’s powered by direct current DC and can therefore be connected directly to a battery.
The other type of motor is a brushless motor, it’s great when you need a lot of power however it’s hard to make it that lightweight. This is the type of motor used on race quads as well as bigger quads. It works by using three AC wires which all separated by a third of a wavelength. They are then connected to different coils that attract and repel the outside magnets.
Motors are categorized by a four digit number. The ones that are mostly widely used on the market are probably the 2206, that means that the stator width is 22 millimeters and the height is 06 millimeters. Essentially, the wider and taller the motor is, the larger the numbers are and the more torque it can produce.
| Name | Motor Size | kV | Cells (LiPo) | Config | Rate |
|---|---|---|---|---|---|
| Lumenier JB2407-7 2407 | 2407 | 2500 | 2-5S | 12N14P | 4.5/5 |
| T-motor F60 P | 2207 | 2500 | 3-4S | 12N14P | 4/5 |
| 3BHOBBY | 2207 | 2650 | 4S | 12S14P | 4/5 |
| BrotherHobby Returner | 2207 | 2700 | 4-5S | 12N14P | 5/5 |
| Lumenier RB2206-8 | 2206 | 2650 | 2-4S | 12N14P | 5/5 |
Brushless motors give you the thrust to reach the high speed, in fact top speed measured is above 200MPH! #quadstardrones
Motors come in different sizes and the two different things you need to look at when buying a motor is the width and the height of the stator. The stator inside is where all the windings are turned around and that has a certain diameter and it has a certain height.
The brushless motor is used in mini and micro drone applications, where high power outputs and efficiency are prioritized.
Further reading:
Drone Motor Fundamentals – recommendations and important things to consider when choosing quadcopter motor.
In general, prices go around from 10-25$ per motor, there are cheaper and more expensive exceptions however.
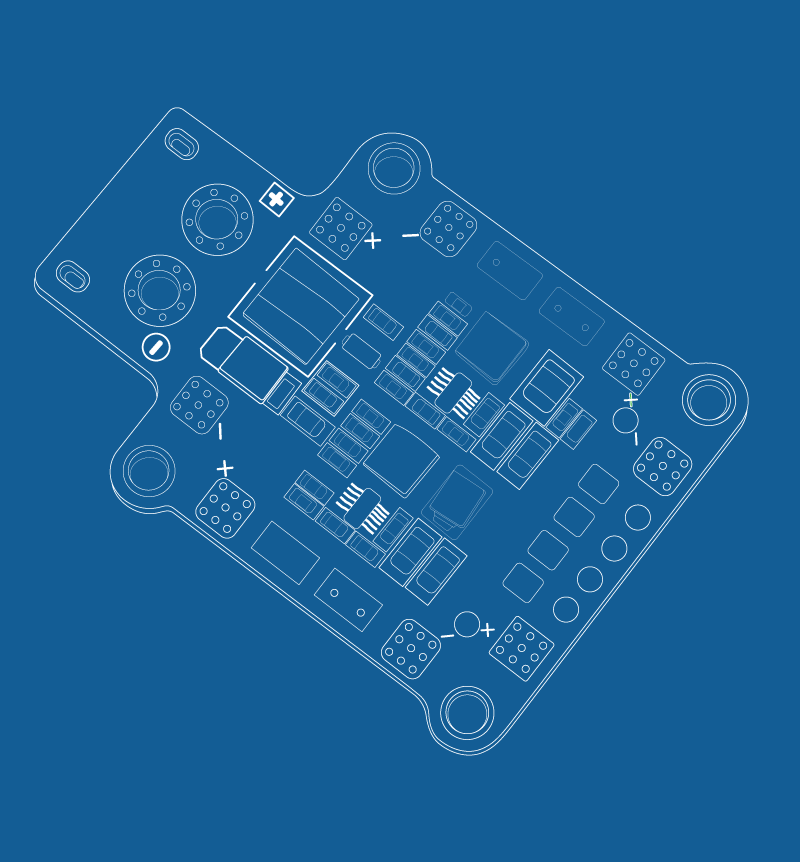
ESC’S ELECTRONIC SPEED CONTROLLERS
ESC’s (Electronic Speed Controllers) translate signals from the FC to provide phased pulses of electrical current through the stator windings of the motor to control its rotational speed. ESC’s are available to purchase individually and more recently have become available as a 4-in-1 PCB. A 4-in-1 saves weight, and is convenient to build it into the stack, It also centralizes the mass of the quad which will improve responsiveness.

ESC’s are available to purchase individually or as a 4-in-1 PCB. A 4-in-1 saves weight, and is convenient to build it into the stack, It also centralizes the mass of the quad which will improve responsiveness. ESC’s can be prone to failure, so using individual ESC’s means you can swap one out if needed.
ESC’s are rated with a nominal Amperage (ie. 20A) and a peak amperage (ie. 25A). Current is measured in Amperes (A), a 1300mAh LiPo (mAh = Mili Ampere per Hour) will provide 1.3A or 1300mA of current for 1 hour before it is completely discharged.
Remember do not use more than 80% of your LiPo’s rated mA capacity.
ESC’s range from around $6 to $20 per piece. When choosing an ESC, find one that can withstand the high current your motors draw. It used to be that anything more than a 20A ESC was overkill, but with the higher kV and greater torque produced by todays motors, it is time to upgrade the 20A ESC’s on your 5” racer!
Most ESCs with a 30A nominal and 35A peak will withstand the currents that arise when flying an FPV drone.
FLIGHT CONTROLLER (FC)

The FC (Flight Controller) is the brain of your quad. All the movements we make on the sticks are processed by the FC, together with the data from the gyroscope, filter algorithms, and PID controller. The FC then calculates the thrust required from each motor to carry out the pilots instruction. The FC signals the ESC’s which regulates the rate of the pulses of current to drive the motor at the required speed.
It usually has a receiver port for ppm/pwm where you can connect the receiver. Beyond that they usually have one or several UART ports where you can connect all sorts of peripherals like LED strips or the newer protocol SBUs.
As with other equipment, there is a large supply of FC’s on the market. FCs differ according to the processing speed of the main microcontroller. There are Flight Controllers that use: F1 (24Mhz), F3 (72Mhz), F4 (84MHz) and F7 (up to 216MHz) micro controllers.
More high quality flight controller will allow you to have faster response rates which then again just allows your quad to be more reactive and handle for example high speed braking and high-speed cornering a little bit better.
Note on Gyro’s : MPU6000 or ICM20608? The MPU6000 is the more common of these 2 gyro chips, it is accurate and reliable, but it is not capable of the 32kHz refresh rate you can get from the ICM20608.
Using a 32kHz refresh rate can cause your quad to behave badly due to over sensitivity to vibration from the motors or unbalanced props. Even with vibration insulation on the gyro, you may find that you also have to soft mount motors and/or the stack. If you still have problems, try reducing refresh rate and looptime from 32Khz.
Flight Controller Recommendations
POWER DISTRIBUTION BOARD (PDB)
The PDB serves to distribute voltage across all components. It directs battery voltage that is transmitted to the ESCs which then continues to the motors, regulating the voltage level from 16.8V to 5V, power’s Flight Controller and Receiver, as well as the video transmitter (VTX) and the camera.
Using a separate PDB is not as crucial as it used to be. Many FC’s these days have an integrated PDB, even if your FC doesn’t you may well be able to find a 5v BEC (Battery Elimination Circuit) on your ESC’s &/or your VTX which could be able to power your FC, FPV camera and RX (receiver).
Many components these days have a wide input voltage range and can be powered direct from the battery, using a “Low ESR Capacitor” is advised to filter electrical noise which can affect your FC and FPV feed.
There are models of PDBs that have only voltage regulation (5 / 12V) and dissipation, and there are more advanced models that have On Screen Display (OSD) showing usefull data on FPV goggles, as remaing power, mAh, battery voltage etc.
TRANSMITTER
A Transmitter (TX) is one of the most important components in the hobby as it will stay with you for a long time. High quality transmitter is good investment as you can use it for different projects and models (simulators, fixed wing planes, etc.). We listed few of them that we find worth checking out. For details check our RC Transmitters guide to get deeper into radio control systems.
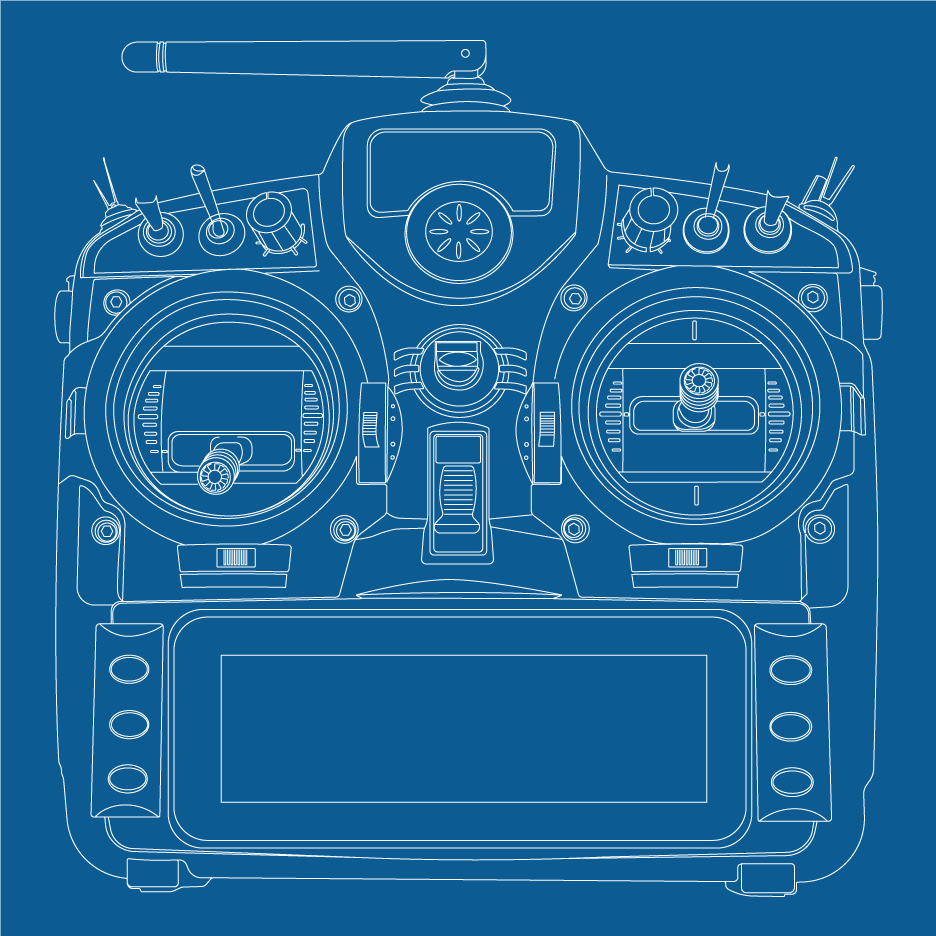
Modes, 1 or 2?
When purchasing a transmitter the “mode” the retailer refers to, is which stick is assigned to which channel. There are others, but mode 1 and mode 2 are most common. Mode 1 places throttle and roll on the right stick with pitch and yaw on the left. Mode 2 places the throttle and yaw controls on the left stick, with pitch and roll on the right. Most pilots (at least in the US) use Mode 2.
Due to this, most of the tutorials and guides you find online are using mode 2 as a reference. Mode selection is very personal, and due to the amount of online information advising me to, I bought a mode 2 transmitter. To this day, I believe my skills may have improved faster if I had actually purchased mode 1, because that was more similar to the way I would set up my controller for computer games.
Of course I might just be making excuses for why I’m not a great pilot! Anyway, unless I find someone with one that I can try, I’m not going to shell out for a new Mode 1 TX just yet…!
Note: the protocol that the transmitter uses to communicate with the receiver is different to the protocol that the receiver uses to communicate with the FC. So even though your FlySky RX might communicate with the FC using the same SBUS receiver protocol as an FrSky RX, the AFHDS / 2A transmitter protocol that your FlySky radio uses to communicate with the RX is different to the FrSky transmitter protocol, which what makes them incompatible.
One cheap solution is a FlySky or turnigy transmitter which comes with a receiver. These use flysky TX protocols AFHDS / AFHDS 2A and RX protocols PWM, PPM, iBUS/SBUS.
Receiver
The Radio Receiver (Rx) receives information from the Transmitter with instructions that are passed to the flight controller. It’s very common to run the receiver on gigahertz since it’s the same channel as Wi-Fi which means it can be used freely.
Choosing a receiver depends on the transmitter you use. There are a number of different manufacturers, and each use their own protocol that is not cross compatible. Make sure that when you buy a receiver or a ready built model with a receiver fitted, that it is compatible with your TX.
Most popular protocols:
- FrSky – most reliable protocol – SBUS serial protocol
- Spektrum – solid reliable, mostly used in the U.S – DSM/DSMX DSM2 protocols
- FlySky/Turnigy – Cheapest Transmitters, SBUS & iBUS, serial protocols. (iBUS is actually faster than SBUS!)
- Futaba – Original developer of the iBUS serial protocol now used by FlySky.
Despite both FlySky and FrSky using SBUS protocol, these RX and TX are not cross compatible.
FlySky protocol, is OK for a beginner, it’s cheap and relatively easy to use. Full featured receivers is where FlySky users are let down, but there are other manufacturers who are now designing for FlySky protocols, so the view from the cheap seats is improving! Also FlyPlus Firmware is now in development which will add a host of new features to the FlySky (iRangeX etc.) FS-i6X.
Either way, we recommend FrSky radios such as the taranis QX7 and X9D because of superior build quality and protocol reliability.
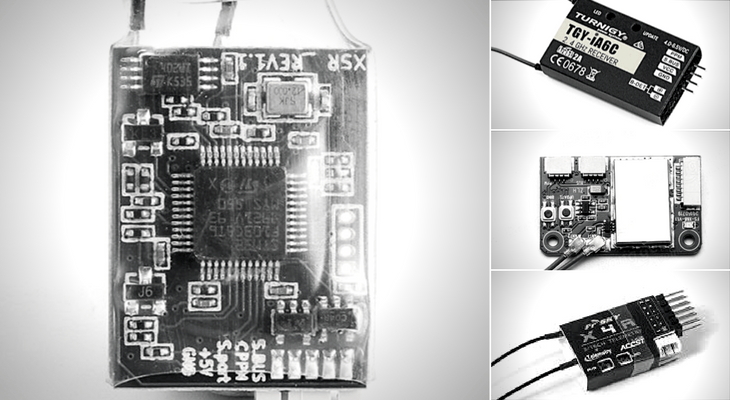
FrSky Receivers
FrSky X4RSB
The most popular receiver in the quad racing. Used by over 60-70% of pilots. It’s small, robust and has a great range.
FrSky XSR
The XSR is also an excellent receiver, whose hardware components are identical to the X4RSB, but is even smaller and is therefore an ideal choice for ultra-fast drones.
FrSky R-XSR
The R-XSR is an even smaller version of the XSR, providing 16 channels over SBUS or CPPM. A full featured, smart port capable, telemetry RX that weighs only 1.5g, amazing!.
FrSky XM+
Model designed for micro drones, range up to approx. 300m. By dimensions it’s the smallest of the FrSky receivers available now.
PROPELLERS

Recommended frames in Chapter 1. are intended for 5″ propellers. It is also the most popular class among the FPV racers because on 4s (14.8v) batteries they have a great power to weight ratio, even with the added weight of a separate HD camera.
Quadcopter Propellers are distinguished by their “Length”, “Pitch” and the number of “blades” they have. These is displayed as a series of numbers, I have mentioned the GemFan Flash 5552×3 a number of times in this article so I will use that as an example. The first two digits represent the length in inches:
55=5.5″
The second two digits represent the pitch of the blades. Imagine that 1 propeller blade continued on its incline plane to rotate a full 360 degrees around the hub. The number describing the pitch is the number of vertical inches that would be between the leading and trailing edge of the blade.
52=5.2″
The third digit simply refers to how many blades the prop has.
X3 = 3 blade prop
Propeller choice depends on the motor and its characteristics. The speed of a motor is measured in kV. The simplest way to explain kV values (k= thousand RPM (Rotations Per Minute) V = at 1V “no load” ie. without a prop).
Generally motor kV ratings for racing quads using 5” props range from 2000kV up to 2800KV, but there are exceptions. As the speed of rotation is dependent on the voltage applied to the motor we understand that a 6S (22.2V) LiPo will turn the motor faster than a 4S (14.8v).
As motor technology improves we see motors that are capable of withstanding greater and greater amounts of current through their windings without overheating and burning out. Due to this advancement manufacturers of propellers are making more and more aggressive props to take full advantage of the additional torque that modern motors are able to generate.
Note : Lower kV motors can spin larger, heavier, more aggressive props (ie the gemfan 5552×3) due to the higher torque they produce. Higher kV motors do not produce enough torque to swing such demanding props efficiently, therefore fewer blades and a less aggressive pitch should produce a better balance between thrust and efficiency.
BATTERIES
Batteries differ according to voltage, capacity and C-rating. Battery voltage is denoted by cell number 2s, 3s, 4s etc. In FPV drone racing, mostly 4S batteries are used. 4S denotes 4 cells wired together in series, each with a nominal voltage of 3.7V totalling 14.8V.
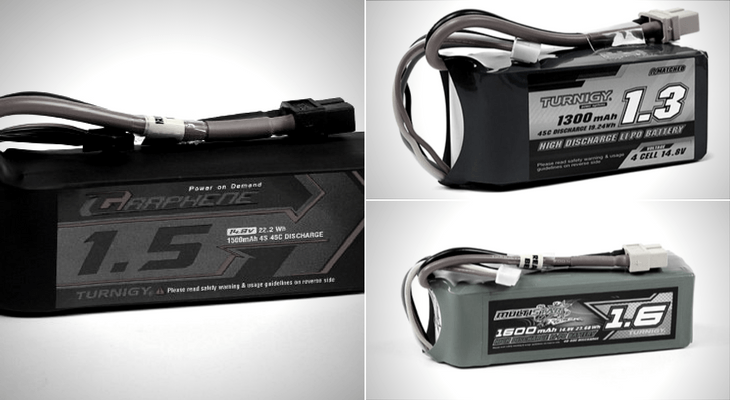
When the batteries are full, each one is charged up to 4.2V, or a total of 16.8V.
Drone batteries also have different capacities expressed in mAh. Racing quads generally use batteries with a capacity between 1000 and 2000mAh. Commonly used capacities are 1300mAh and 1500mAh.
This tends to be the sweet spot of thrust to weight, flight time and maneuverability. C-rating (Discharge Rating) refers to how fast a LiPo battery can safely be discharged, discharging a battery too quickly will make it hot, and in extreme cases can lead to a LiPo fire. In practical terms – the amount of current that the battery can deliver to the motors at any 1 time.
eg. 4s battery capacity 1300MAh with C-rating 45C can safely deliver:
45*1.3(capacity/1000)=58,5A
So when you consider that 1 of your BrotherHobby Avenger motors is going to be drawing as much as 40A, you realise that higher C rated batteries are necessary for today’s hardware.
The 1300mAh Tattu R-Line Batteries I recommended previously have a 95C discharge rate – if we plug that back into the formula we get
95 * 1.3 = 123.5A
You see why I recommend them for racing?
Note : Some battery manufacturers inflate their discharge rating statistics.
The battery prices range from $15 to $50 per piece for a 1300MAh 4s pack. Do yourself a favour and check out reviews before you buy cheap LiPo’s If you are a beginner expect about 3-5 minutes flight from a 1300mAh, and if your just learning acro don’t expect those 3-5 mins to be all in one go!
With a 1500MAh LiPo you should get about 6-7 min, but you will feel the additional weight of the battery, your quad will be slower to respond, and it will also carry more inertia into a crash which could mean more damage.
When you get more confident you will use the throttle more comfortably and your flight times will fall to 2-3 min for the 1300 mAh battery. With a bit more experience your flying will be more smooth, and as you learn to use the power more efficiently and you may be able to gain back one of those minutes.
Indestructible Quads ‘Black Label’ 1300mAh 4S True 80C
These are great LiPo’s, affordable, reliable and Ke at ‘indestructible’ provides amazing customer service. He has a small range of LiPo’s specific to 120mm – 300mm racing or freestyle quads.
Turnigy Graphene 1500MAh 4s 65C
Turnigy have been producing decent quality batteries for a long time now. In addition the Graphene claims to have a higher energy density, builds internal resistance slower, and is less prone to voltage sag than the standard LiPo chemistry. The are a bit heavier though.
The choice of the professional! Tattu R-Line batteries are widely renowned for producing some of the best Drone Racing batteries in the business.
The larger capacity of the markets most popular battery, for those who just don’t want to come down!
BATTERY BALANCE CHARGER/DISCHARGER
To power your batteries you’re gonna need a charger. Least expensive one we found on the market, that charges 4S batteries:
EV-Peak E3 35W 3A – Budget Micro Option
Charsoon DC-4S – Budget Option
This simple little charger is cheap as chips and comes with an AC-DC power converter, maximum of 3A charge rate, but for the price it’s a bargain.
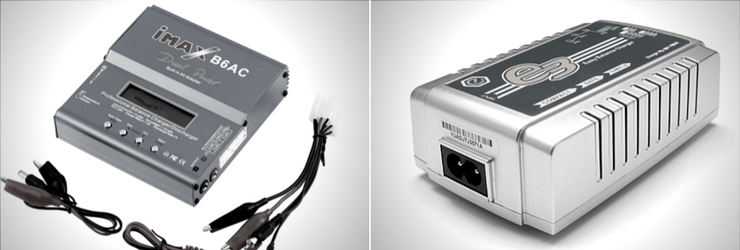
IMAX B6-AC – Advanced Option
The Imax comes with a lot of different connectors, and apart from LiPo batteries you can charge other types of battery chemistry (NiMH,LiFE etc.) This is a simple charger that works very well, there are clones available if you really must save a few $$, but the quality will likely not be as good as the real thing. When overcharging a battery can result in a fire, quality products are the best choice.
iSDT Q6 Plus 300w – Expert Option
The iSDT Q6 is one of the most popular chargers around, it’s a great quality unit with easy to use colour display and the 14A output make it really popular for many pilots to parallel charge multiple batteries.
FPV EQUIPMENT
When you build a drone composed of the above-mentioned components you have all the mechanical parts for flight, and you can now fly LOS (Line of Sight).
It’s a good thing to practice LOS flying if you’re a beginner, every time you fly it build muscle memory, but even accomplished FPV pilots should practice their LOS skills once in a while in case of FPV equipment failure.
But what makes flying really exciting is First Person View (FPV). To complete the FPV system you will need:
- Camera
- Video Transmitter with antenna (VTX)
- FPV goggles / headset with video transmitter (VRX)
Many newer goggles use a system called “Receiver Diversity”, which uses 2 or more receiver boards, each with their own antenna. This system will automatically switch to the receiver that is receiving the best signal.
Note : Some cheaper goggles use 2 antennas with a single VRX, this system is far inferior and is called “Antenna Diversity”.
FPV Camera
FPV Camera is your eye in the sky, this is what you will be using when you are flying fpv and looking through goggles or screen. The cameras come with 2 variations: those with CMOS sensor and CCD sensor.
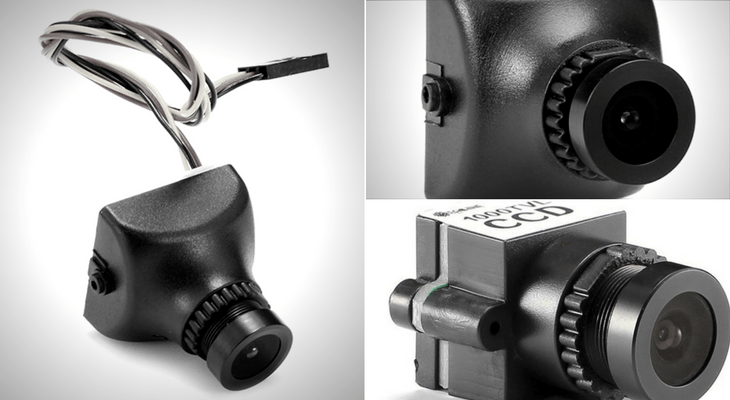
Higher quality cameras mostly use a CCD sensor that has less latency, faster adaptation to light change. CCD cameras are also more resistant to vibration and do not suffer from Jello as much as CMOS.
Cameras also come with different image ratios ie. 16:9 and 4:3. There are also different signal types ie. PAL and NTSC.
These days it is common for most equipment to be compatible with either, so you should be able to change both your camera and your goggles from PAL to NTSC. It is only now becoming more common for cameras and goggles to able to switch between image formats.
4:3 is the older more square image, 16:9 is widescreen. However, the image sensor in most FPV cameras is a native 4:3 sensor, so you will see more of your surroundings using a 4:3 image ratio on your display.
Counter-intuitively, when switching to widescreen, you are actually trimming some of the top and the bottom off the image to fit your screen, so you see less.
Note : We recommend that you select goggles that are capable of displaying both NTSC and PAL signals, therefore you can use either type of camera. If your FPV display only operates with PAL or NTSC, but not both, then all the FPV cameras you purchase must operate on the same protocol.
There is a lot to know about frequencies and bands inside of frequencies but we will go through this in more depth in specific FPV Camera guide.
Video Transmitter VTX
A VTX is the transmitter for your video feed, transmitting the analog video signal received from the FPV camera to the video receiver. VTX are available with various differences. “Channels” and “Bands” refer to the different frequencies encompassed by 5.8gHz, often there are 5 bands and 8 channels on each band.
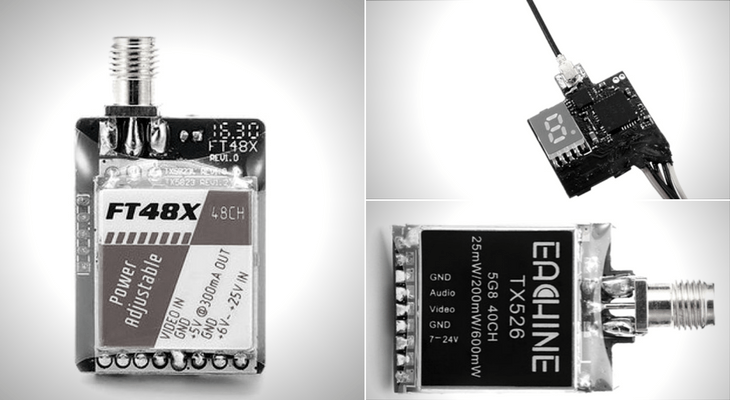
Most VTX have 40 or so different channels, but some have 70 or more! RaceBand has been set up to evenly space signals so racers can all use the same band and know that there will be minimal signal “bleeding over” causing interference to others.
Another important thing to understand about visual transmitters or that they have different power outputs. They range from 25-100-200-600-800 millivolts.
If you’re flying in a competition you get limited to 200 millivolts. Usually if somebody else is on a frequency very close to the one that you’re flying on if you have a more powerful transmitter than them, then your visual will actually leak over to their goggles and then they will have a very bad signal when they’re flying. So it’s really important to have a high quality vTx.
Note : Countries have different regulations restricting various specific frequencies encompassed by 5.8gHz, also higher power outputs on 5.8gHz have restrictions and/or require a HAM radio licence. Check your local regulations, and remain on the good side of law! Legality is also not the only issue, there is quite a lot of bad press related to ‘drones’ at the moment. The world is still working to understand the best way to regulate drone usage to ensure the safety of the general population. Any blatant disregard for regulations will reflect badly on the entire hobby and could lead to harsh blanket restrictions that will affect us all.
FPV Antenna
FPV antenna is the decisive part that defines the range and signal strength of your FPV system. Antenna attaches to the visual transmitter, because without an antenna that signal isn’t really going to go anywhere.
Male is screw thread inside, female is screw thread outside. SMA Male is needle, and SMA Female is hole. RP-SMA are opposite.
Remember that polarized antennas only work with the same direction of polarization. So if you have an RHCP (Right Hand Circular Polarized) antenna on your quad, you must have an RHCP antenna on your VRX too.
Aomway 5.8Ghz 4 Leaf RHCP
Best buy antenna, 1 pc is $ 6.5. Resistant to shock and excellent signal. Be careful when selecting a connector.
Rubbered FPV Antenna
The popular antenna among FPV racers due to their small dimensions and endurance. Also, be aware of the choice and layout of the L and W type connectors
Emax Pagoda Antenna
Pagoda antennas have become popular recently as they are easy and cheap to build as they can be printed onto a PCB and simply assembled around a piece of coaxial cable. Check out this article explaining how you can make 160 pagoda antennas for not much more than $40!
GOGGLES HEADSET AND RECEIVERS
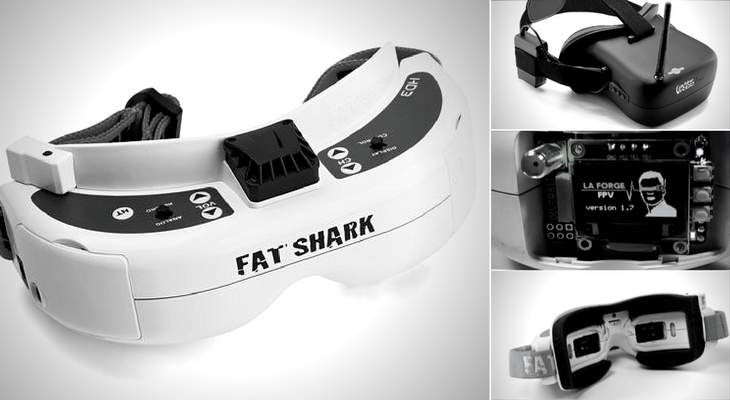
Goggles are what makes fpv fpv. We want to see what the drone is seeing in real life in real time. They are using quicker and more reliable source – analog video. Analog ultimately provides a lot lower latency but also a lower video quality.
Check our indepth Guide on FPV Goggles and Receivers!
When using analog it’s not going to just turn off if you go behind a building or something, it’s going to linearly degrade and then come back. That’s kind of the the good thing about analog videos. It’s very predictable to an extent.
Immersive feel is really what you want. And that’s kind of why buying a good set of goggles is extremely important and definitely the most important purchase.
The goggle is probably going to be your most important thing to buy or spend money on because you want a high quality set of goggles. That’s really what makes fpv fun – being able to see what the drone sees.
HELPFULL TOOLS AND EQUIPMENT
If you want to build your own drone, and to service it later, you need various specialized tools to make that happen. We made an extensive list of must have quadcopter tools used to build and repair in separate guide, so be sure to check it out.
Soldering Station
Soldering Station with Adjustable Heat Range
You can use a cheap iron, but you will need one that is a minimum 40W. You will also need very fine tips for the scale we are working on, fine tips tend to oxidize quickly, so make sure you clean the tip every time you use it.
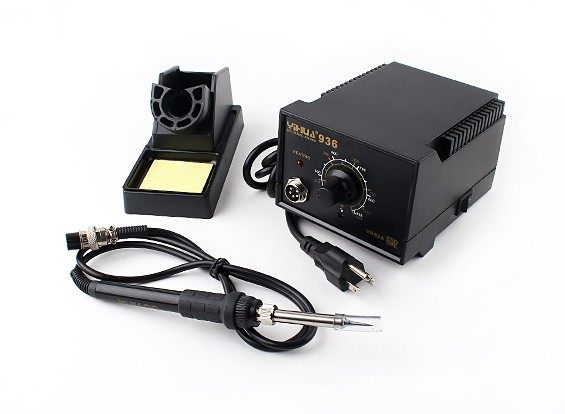
Best buy, at this price it has no competition. It has temperature setting, stand and sponge. Don’t forget you will also need some good quality lead solder, a solder sucker, and flux. Helping hands are also err, helpful, handy? A quick tip, if you don’t have helping hands, wrap a rubber band around the handle of some long/needle nose pliers, easy!
When you assemble your first quad, you might find that some small piece (such as a buzzer) has been overlooked. If you can’t find what you need locally, and it’s going to take 3 weeks for that $2 part to arrive from China, go past your local flying field and see if you can’t someone who can help, anyone who has been flying for long will probably have quite a few spares!
Generally people who fly quads are addicts, addicts love talking about what they are addicted to, especially to another prospective addict!!!
Tools that will help you make and service your drone:
- Electrical or insulation tape
- Zip or Cable ties
- Scalpel or craft knife
- Imbus / hex or allen keys
- Polyolefin H-type Tubing Tube
- Silicone Wire
- Velcro Tape
- XT60 Connectors
- XT30 Connectors for micro’s
- Hex Spacers Screw
- M3 Carbon Steel Allen Bolt
- Separate motor’s, ESC’s … 🙂

Micro FPV Drones – most popular known as Tiny Whoop
A Tiny Whoop is a quadcopter that is based on the Blade Inductrix, but with an added FPV camera. These tiny micro drones use very small brushed motors and are ideal for indoor flying. Compared with larger racing quads they are easier to fly, due to their low mass they carry very little inertia into a crash and are therefore resilient, and inexpensive to start flying.
A Tiny Whoop is great choice for entering in the world of drones, the design of the ‘ducts’ provide great protection for the props so you can keep flying even when bumping into obstacles. They are not designed for outdoor flying, because they are so light, even a little breeze can put them off trajectory.
Also any open space swamps any sensation of speed on such a small craft, so while flying indoors is really exciting, flying outdoors feels a bit slow. If you want to explore further, we made extensive guide on micro fpv quadcopters.
BNF
Tiny Whoop Roots
Inductrix FPV
The Blade Inductrix FPV has been designed in response to the global craze of Tiny Whoop micro FPV drones. Basicly you pull the original inductrix apart to add an FPV Camera. With the canopy this looks much more like a finished product than the E010 versions. Starting out with a ‘Tiny Whoop’ you have everything you need for a real FPV experience.
USEFULL WEBSITE’S AND CHANNEL’S
oscarliang.com – indepth resource on FPV
Joshua Bardwell – Great YouTube channel with extremely detailed information on everything multi-rotor.
RCModelReviews – Youtube channel for no nonsense reviews and information on a wider range of RC aircraft.
AndyRC – YouTube channel mainly focussed on ready built model reviews, detailed BetaFlight setup of each model is a great touch for someone looking at a specific model.
miniquadtestbench.com – test’s of ESC’s and motors
EngineerX – YouTube channel focussing on motor thrust tests
UAVfutures – excelent youtube channel for entering FPV experience
Rotor Riot – one the most popular channels on FPV
Flite Test – from Drones, to Fixed Wing RC, to Full Scale Flight
FPV Academy – beginners guide to FPV
FAQ
Acro Mode
Acro mode is the only way to fly, using a stabilized flight modes like Horizon or Angle mode are easier to start with, but you will soon begin to feel limited by it. Stabilized modes will also teach you bad flying habits that will be hard to shake when you graduate to Acro.here…
Practice on simulators
There are many drone simulators for FPV flying. We definitely recommend practicing a lot, it will help you develop muscle memory using the sticks. Sims are great to allow you to practice without fear of crashing your quad. More crashes in a simulator should mean fewer crashes and less damage to your quad.
Before you fly
Check your local rules, laws and regulations. Assess yourself (are you in a condition to fly), observe your surroundings, make sure there are no people or property that you may injure or damage. Take some time to inspect your gear before you take off, crashing because you failed to miss something obvious is really annoying, and can end up costing you more in the long run. Also check out our Pre-Flight Checklist.
How fast are FPV Racing Drones?
Many racing quads these days are capable of phenomenal speed, even cheaper ready built craft are becoming blazingly fast. However, how fast your drone feels when you fly FPV, is actually less to do with the hardware that you are using and more to do with camera angle. A quad needs to tilt forward to move forward, the further forward you tilt, the more thrust you will need to apply to stop losing altitude, and the faster you will go.
When flying FPV you need to tilt your camera upwards so that you are not looking at the ground when flying fast. The further up you tilt your camera, the faster your quad will go when the camera view is level with the horizon. After adjusting your camera angle you will find your throttle control is affected, you will now need more throttle to maintain altitude with the camera level with the horizon. Increasing your “Throttle Mid” and adjusting “Throttle Expo” can help to retain the throttle levels that you are used to.
What are “Cloned” products
Cloned products are components that have been copied by manufacturers other than those who developed the product. While I think that cloned products are necessary for price competition, and to provide those with a small budget to still have access to flying FPV. However you must be aware that when you buy a cloned product none of your money is going to the people who actually innovate, develop and improve the hobby. So if you have already built a quad, try to include as many legitimate parts as you can reasonably afford in your next build.
Affiliate Links
Affiliate links are links to products that will generate some commission for the person who has provided the link. Some people have a strong objection to affiliate links but they do not increase the cost to the customer. In fact using affiliate links is a great way to show your support for the people who spend the time to create content to help newcomers to the hobby!
- Drone Pipeline Inspections in Oil and Gas Industry - November 23, 2023
- Wind Turbine Inspection using Drones - November 16, 2023
- Agriculture Drone Mapping: Data-Driven Decisions - October 29, 2023